![]()
![]()
Follow the steps below to process a one-time Credit Card or ACH payment for a new or existing customer in the ReceivablesPro Mobile App. Note that unlike swipe transactions, you must always select a saved customer (or enter and save a new customer), prior to processing the payment.
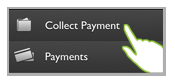
Open the Collect Payment screen by tapping Collect Payment in the Quick Menu.
The Collect Payment screen opens without a customer loaded, as shown below.
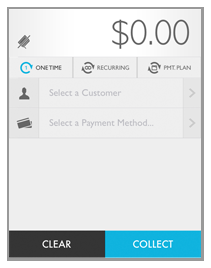
Tap the $0.00 Amount field to open the number keypad and enter the payment amount. Then tap the close keypad icon to return to the Collect Payment screen. (Tap the back x arrow to clear the amount.)
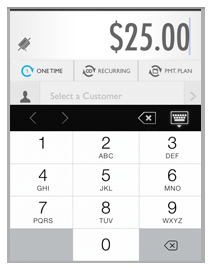
NOTE: The value is entered from right
to left, and moves from the second decimal number. Thus, to enter
a ten dollar payment type 1 then 0 then 0 then 0 to end up with “10.00.”
If you simply enter 10, your transaction will be for ten cents, not
ten dollars.
NOTE: You cannot enter negative numbers to process a credit. Only positive
numbers (payments) are supported.
NOTE: If you make a mistake, you can tap the Amount section
again to correct it. Clicking Clear will clear the entire form, including
the active customer, payment account, and amount-- so don’t use it
if all you want to do is correct the payment amount.
Leave ONETIME selected as the payment type. (This is the default setting for the screen.)
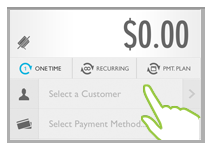
Tap Select a Customer to go to the Customers screen.
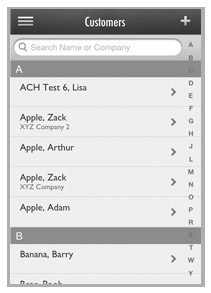
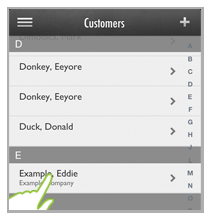
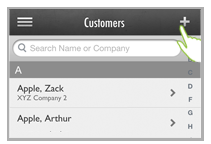
The Customers screen opens in browse mode.
Select an existing customer or create a new Customer Record.
To locate and select an existing customer, use one of the following methods:
Scroll though the list of customers until you find the customer you want.

Tap the customer name to load it into the Collect
Payment screen.
NOTE: Customers are listed alphabetically
(last name first) and grouped by first letter of last name.
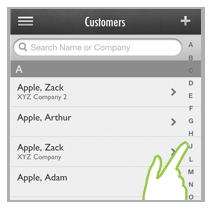
Tap one of the letters in the far right column to go to that customer group. Then scroll to locate the customer you want. Tap the customer name to load it into the Collect Payment screen.
Search for the customer using the search bar at the top of the screen. You can search by customer first name, last name or company name. Follow the steps below.
Touch the search bar to open the keyboard.
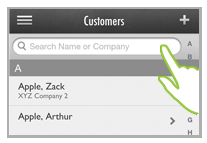
Begin typing any portion of the customer’s name or company name.
Matches will begin appearing below the search bar and above the keyboard.
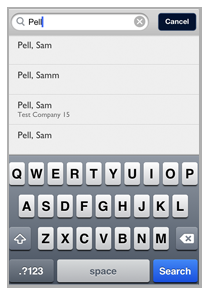
If you see the customer you want, tap it to close the keyboard and load the customer into the Collect Payment screen.
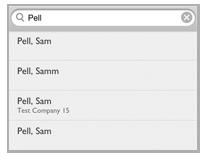
If
there are too many matches to display above the keyboard
after you have typed the complete search string, tap the
blue Search button
at the bottom right of the screen. This will close the
keyboard and display the full list of matches from which
you can select. Scroll through the list to locate the
customer you want to charge, and tap it to load the customer
into the Collect Payment
screen.
NOTE: To refine the search,
tap the Search bar at any time to open
the keyboard and enter additional search text. To clear
the search and begin a new one tap the “x” icon in the
right corner of the search bar. To return to the browse
screen, tap the Cancel
button to the right
of the Search bar.
To enter a new Customer Record, follow
the steps below.
NOTE: These are the minimum requirements
for a Customer Record. See Adding Customers while Entering Payments and
Schedules for detailed
instructions.
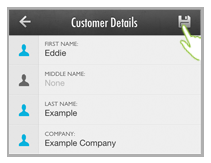
Tap the + icon in the top right of the screen header to open the Add Customer screen.
The
customer Details screen
opens with a blank record. Tap a field to enter customer information.
NOTE: After accessing the initial
field, tap additional fields to enter data.
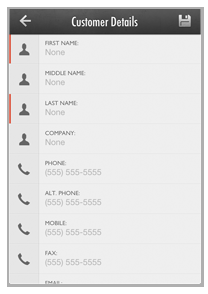
Enter
the Customer’s First, Middle and
Last name, Company name
(optional), Phone number,
Email address,
and full Billing address.
NOTE: First
and Last name
and Billing address are required, as indicated
by the red lines to the left of the fields. As you complete
fields the grey icons will turn blue, and the red markers
on required fields will be removed.
Review the entries, and tap any field to make a correction.
Tap the Save icon at the top-right of the screen to save the new Customer Record.
You are returned to the Collect Payment screen with the customer you just selected/added active.
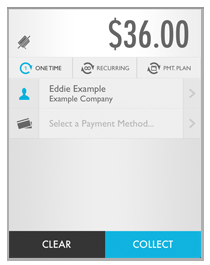
Select or enter the payment account you want to charge using one of the following methods.
Swipe a
credit card using the ReceivablesPro swiper
attached to your mobile device. This account will be attached
to the Customer Record you selected in the previous step-- regardless
of the name on the credit card.
NOTE: You will only have this option
if you have properly installed and attached the ReceivablesPro swiper. You
will know the App recognizes the swiper when you see the color
swipe icon to the left of the payment amount. (See About Mobile Swipe Transactions above for information on obtaining
an installing the swiper.)
Tap Select Payment Method...
The Select Account screen for the active customer opens.
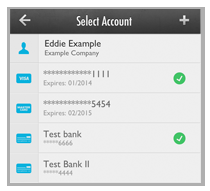
Tap
any saved credit card or bank account to select it for the
payment.
NOTE: If there are a large number
of saved accounts, you may need to scroll to see them all.
NOTE: You are not able to see full account details from this
screen, nor are you able to delete accounts from this screen.
Deleting accounts can be done from the Customer Details screen.
(See Delete Payment Accounts for detailed instructions.)
|
Editing payment accounts can only be done from the web-based application, with one exception. If you want to update the expiration date for an existing credit card, add the card again as a new card and use the new expiration date. The system will recognize the duplicate card number and update the existing record with the new expiration date. (See Update Credit Card Expiration Dates below for details.) |
You are returned to the Collect Payment screen with the account you selected active.
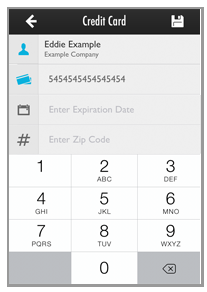
To hand enter a new account, follow the basic steps below. (See Adding Payment Accounts for New Payments and Schedules for detailed instructions.)
Tap Select Payment Method...
The Select Account screen for the active customer opens.
Tap the + icon to the right of the Accounts header.
The Type of Account menu appears at the bottom of the screen. Select ACH or Credit Card as appropriate.
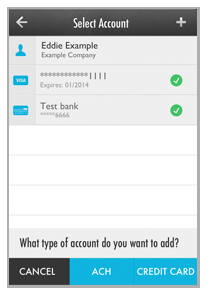
The Add Credit Card (or Add ACH) screen opens.
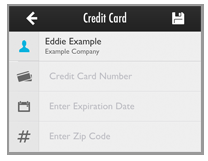
Enter required information for the type of account you are adding, and tap the SAVE icon.
You are returned to the Collect Payment screen with the account you just added active.
On the Collect Payment screen, review the Amount, Customer, and Payment Account. Make any necessary changes. (Tap any field to open it’s configuration screen to make a change.)
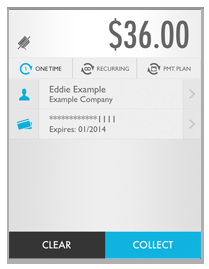
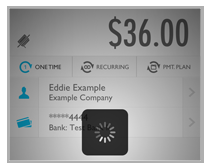
Tap the COLLECT button to submit the payment.
The top of the screen grays-out, and a confirmation message appears at the bottom of the screen asking you to confirm the payment amount and customer charged.
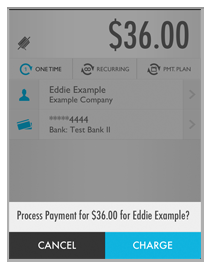
Tap CHARGE to process the payment, or CANCEL to return to the Collect Payment screen without processing the payment.
If you swiped the card, the signature
screen opens. (This screen will never appear if you hand entered or
selected the payment account, or if the transaction is for under $25.)
Hand the mobile device to your customer and have them use a finger
to sign on the line and then tap the Confirm button
to authorize the transaction.
NOTE: If your account is only configured
for MOTO (card not present) processing, a signature is not required.
Providing your customer the ability to sign for and confirm the transaction
is cosmetic and included to help them feel more comfortable about
the mobile payment. If you do not want to use this feature, it is
fine to omit the signature and simply tap the Confirm button
on the screen yourself to complete the transaction.

It may take a few seconds for the transaction to process, during which time you’ll see the “Processing...” icon.
When the transaction is complete, you’ll see the Transaction Result screen. The top of the screen will indicate the transaction status, whether it was successful, and whether an email receipt was sent.
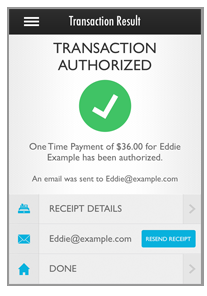
Tap RECEIPT
DETAILS to see complete transaction details. Tap the
back arrow in the top-left corner to return to the Transaction
Result screen.
NOTE: If you need to void the payment
you can do it from this screen by tapping the Actions icon in
the top-right corner. (See Void Payments
for instructions.)

Send an email receipt and/or update the email address and re-send the receipt. The mobile App sends receipts based on the email receipt settings you configured for your Client Account. (See Email Preferences and Templates in Chapter 8 for instructions on how to configure email settings.)
If an email was sent, there will be a message on the Transaction Result screen and you will see a RESEND EMAIL button next to the email address to which the receipt was sent.
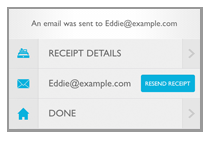
If there is a saved email address, but you have configured your system not to automatically send email receipts, the saved address will be in the Email field, and a SEND RECEIPT button will be shown.
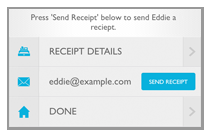
If no email address is saved for the Customer, the email field will be blank. You can enter an email address now to activate the SEND RECEIPT button.
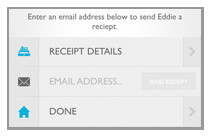
Confirm that the displayed email address is correct. If it is not, or if there is no email address saved with the Customer Record, tap the field to enter a new one.
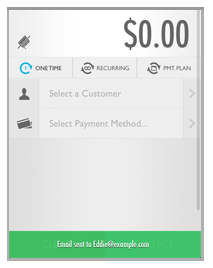
The
email is sent, and you are returned to the Collect
Payment screen with a success message for the email
at the bottom. Tap anywhere on the screen to clear the message.
NOTE: Once you tap the SEND RECEIPT (or RESEND
RECEIPT) button you will no longer be able
to get back to the Transaction
Results screen.
To view transaction details, locate the transaction in the
Payments
screen. (See Payments for detailed instructions.)
Tap
DONE to return to
a blank Collect Payment screen
without saving an email address for the Customer, and without
sending (or resending) a receipt email.
NOTE: Payment processing rules require
you to provide your customer with a receipt unless the customer
actively declines to receive it. Thus, if you do not have an email
address, and your customer wants a receipt, you will need to be
able to provide it in some other way. (You can print the Transaction Details
page from the web-based ReceivablesPro interface
and mail or fax it to your customer, if necessary.) If your customer
declines to provide an email address and waives the receipt, it
is fine not to send one.
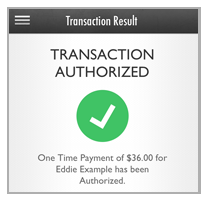
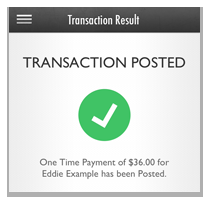
The following are possible Transaction Results, and what they mean.
Transaction Authorized: Indicates that a credit card transaction was successfully processed.
Transaction Posted: Indicates that an ACH transaction was successfully processed.
Transaction
Failed: The payment was not successfully processed. If
you see this message your customers WILL NOT receive an email notifying
them of the failure. For credit cards, the Trace
Code field will provide a code that represents the failure
reason. For example, in the screen capture below the credit card charge
for $9999.05 failed with a code of 41-- which is a hold call code
that indicates that there may be a problem with the card.
NOTE: The most common failure code is
05, which means that the transaction was declined.

|
For failed ACH transactions, you will need to view the transaction in the web-based UI in order to determine why it failed. This information can be found in the Reason Description field in the Transaction Details page. See Appendix B: ACH Return Codes for information about ACH Failure Codes |
Once a payment is processed it is immediately visible in the web-based version of ReceivablesPro. From the web-based UI you’ll have access to all functionality available for payments including the ability to print and re-email the payment receipt.

