![]()
![]()
Follow the steps below to enter a payment plan schedule for a new or existing customer in the ReceivablesPro Mobile App.
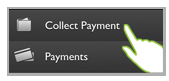
Open the Collect Payment screen by tapping Collect Payment in the Quick Menu.
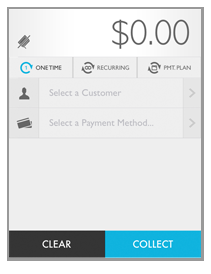
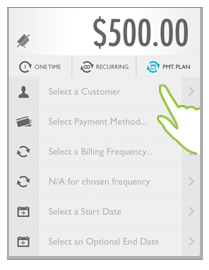
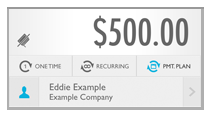
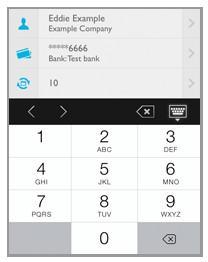
The Collect Payment screen opens without a customer loaded, as shown below.
Tap the $0.00 Amount field to open the number keypad and enter the full payment plan amount. Then tap the close keypad icon to return to the Collect Payment screen. (Tap the back x arrow to clear the amount.)
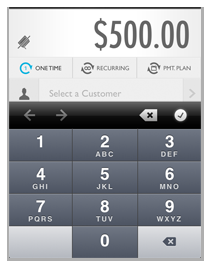
NOTE: The value is entered from right
to left, and moves from the second decimal number. Thus, to enter
a five hundred dollar payment plan type 5 then 0 then 0 then 0 then
0 then 0 to end up with “500.00.” If you simply enter 500, your payment
plan will be for five dollars not five hundred dollars.
NOTE: If you make a mistake, you can tap the Amount section
again to correct it. Clicking Clear will clear the entire form, including
the active customer, payment account, and amount-- so don’t use it
if all you want to do is correct the payment amount.
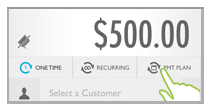
Tap PMT. PLAN to open configuration fields for a payment plan schedule.
Tap Select a Customer to go to the Customers screen.
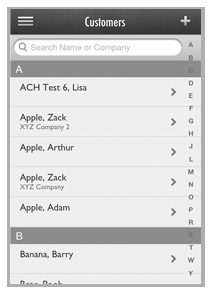
The Customers screen opens in browse mode.
Select an existing customer or create a new Customer Record.
To locate and select an existing customer, use one of the following methods:
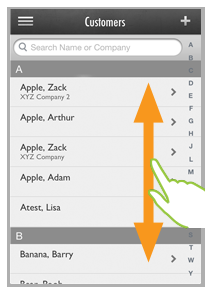
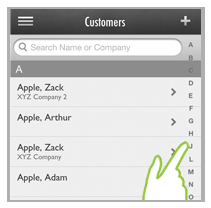
Scroll though the list of customers until you find the customer you want.
Tap the customer name to load it into the Collect
Payment screen.
NOTE: Customers are listed alphabetically
(last name first) and grouped by first letter of last name.
Tap one of the letters in the far right column to go to that customer group. Then scroll to locate the customer you want. Tap the customer name to load it into the Collect Payment screen.
Search for the customer using the search bar at the top of the screen. You can search by customer first name, last name or company name. Follow the steps below.
Touch the search bar to open the keyboard.
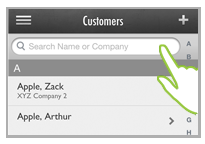
Begin typing any portion of the customer’s name or company name.
Matches will begin appearing below the search bar and above the keyboard.
If you see the customer you want, tap it to close the keyboard and load the customer into the Collect Payment screen.
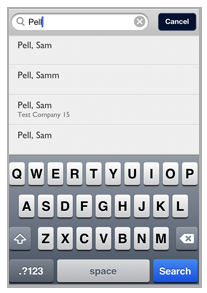
If
there are too many matches to display above the keyboard
after you have typed the complete search string, tap the
blue Search button
at the bottom right of the screen. This will close the
keyboard and display the full list of matches from which
you can select. Scroll through the list to locate the
customer you want to charge, and tap it to load the customer
into the Collect Payment
screen.
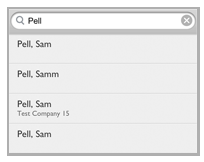
NOTE: To refine the search,
tap the Search bar at any time to open
the keyboard and enter additional search text. To clear
the search and begin a new one tap the “x” icon in the
right corner of the search bar. To return to the browse
screen, tap the Cancel
button to the right
of the Search bar.
To enter a new Customer Record, follow
the steps below.
NOTE: These are the minimum requirements
for a Customer Record. See Adding Customers while Entering Payments and
Schedules for detailed
instructions.
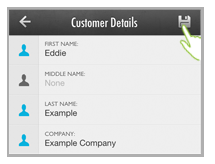
Tap the + icon in the top right of the screen header to open the Add Customer screen.

The
Customer Details screen
opens with a blank record. Tap a field to enter customer information.
NOTE: After accessing the initial
field, tap additional fields to enter data.

Enter
the Customer’s First and
Last name, Company name,
Phone number,
Email address,
and full Billing address.
NOTE: First
and Last name
and Billing address are required, as indicated
by the red lines to the left of the fields. As you complete
fields the grey icons will turn blue, and the red markers
on required fields will be removed.
Review the entries, and tap any field to make a correction.
Tap the Save icon at the top-right of the screen to save the new Customer Record.
You are returned to the Collect Payment screen with the customer you just selected/added active.
|
You can swipe
a credit card using the ReceivablesPro swiper
attached to your mobile device to enter the Customer and
Payment Account into
the payment plan entry form. If you do this, the system will
load the Customer Record attached to the swiped card number,
or it will create a new Customer Record based on the card
data. (See Swiping a Card for New Payments and Schedules
for details.) |
Select or enter the payment account you want to charge using one of the following methods.
Swipe a credit card using the ReceivablesPro swiper attached to your mobile device. If you do this the credit card will be attached to the active Customer Record regardless of the name on the card.
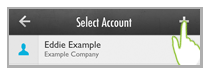
Tap Select Payment Method...
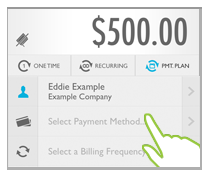
The Select Account screen for the active customer opens.
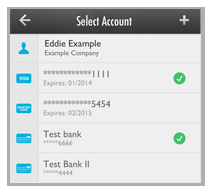
Tap
any saved credit card or bank account to select it for the
payment.
NOTE: If there are a large number
of saved accounts, you may need to scroll to see them all.
NOTE: You are not able to see full account details from this
screen, nor are you able to delete accounts from this screen.
Deleting accounts can be done from the Customer Details screen.
(See Delete Payment Accounts for detailed instructions.)
Editing payment accounts can only be done from the web-based
application, with one exception. If you want to update the
expiration date for an existing credit card, add the card
again as a new card and use the new expiration date. The system
will recognize the duplicate card number and update the existing
record with the new expiration date. (See Update Credit Card Expiration Dates below for details.)
You are returned to the Collect Payment screen with the account you selected active.
To hand enter a new account, follow the basic steps below. (See Adding Payment Accounts for New Payments and Schedules for detailed instructions.)
Tap Select Payment Method...
The Select Account screen for the active customer opens.
Tap the + icon to the right of the Select Account header.
The Type of Account menu appears at the bottom of the screen. Select ACH or Credit Card as appropriate.

The Add Credit Card (or Add ACH) screen opens.
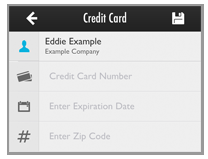
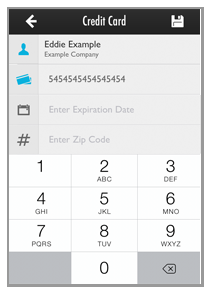
Enter required information for the type of account you are adding, and tap the SAVE icon.
You are returned to the Collect Payment screen with the account you just added active.
Review the payment
plan amount, customer, and payment account. Make changes if necessary
by tapping a field to open it and entering a new value.
NOTE: Notice that as you enter valid
data into a field its icon (located at the far left of the field)
turns blue.
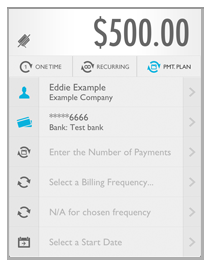
Tap the Number of Payments field to enter the total number of payments that will comprise the schedule. This opens the keypad. Enter any number between 1 and 99. Then tap the next arrow to enter billing Frequency.
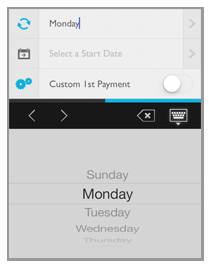
Select the primary billing Frequency from the wheel.
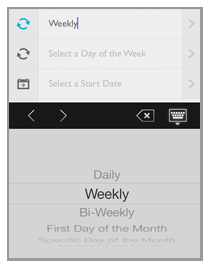
If you
selected “Weekly,” “Bi-Weekly” or “Specific Day of Month” the
next arrow after entering the Frequency to
enter the Frequency Parameter.
NOTE: You will see a day of week
wheel for “Weekly” and “Bi-Weekly” or a number wheel (1-31) for
specific day of month.
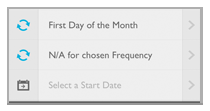
NOTE: If you select any other frequency
you will see the N/A message in the Frequency
Parameter field, as shown
below.
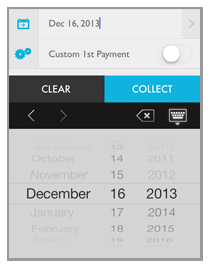
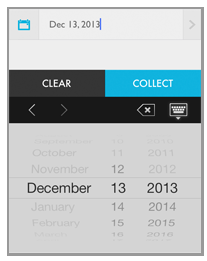
Select the schedule Start
Date from the wheel.
NOTE: Payment Plan schedules do not have
an end date. They end when all scheduled payments are made.
If you do not
want to enter a Custom 1st Payment tap
COLLECT to close the
wheel and save the schedule. Go to Step 16. If you do want to use
a Custom 1st Payment, go to
the next step.
NOTE: You can also tap the close keypad
icon to close the wheel and review your entries.
Enter a Custom
1st Payment if desired. The default setting is “OFF.”
Follow the steps below to configure the payment.
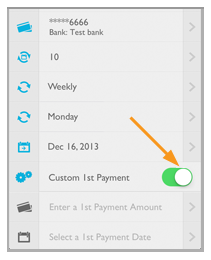
NOTE: A Custom First Payment is a one-time
payment processed on the current date or any date prior to the schedule
Start Date. It is deducted from the plan Total
Amount Due prior to calculating
the schedule payment amount. For example, if a payment plan total
due is $200, 10 payments are programmed, and a $100 Custom First Payment
is configured, the schedule payment amount will be $10.00.
Tap the Custom 1st Payment toggle to switch it to “ON.”
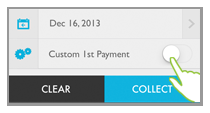
The wheel closes if it is open, and the Custom 1st Payment toggle now displays as “ON.”
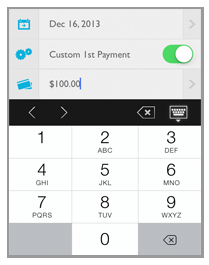
Tap the Custom 1st Payment Amount field to open the keypad. Enter the payment amount. Then tap the next arrow.
Select
the Custom 1st Payment Date
from the wheel.
NOTE: You can select the current
date or any date prior to the schedule Start
Date.
Tap COLLECT to save the schedule. Or, tap the close keypad icon to close the wheel and return to the Collect Payment screen to review your entries, then tap COLLECT when you are ready to save.
The screen grays-out and a confirmation opens at the bottom of the screen asking you to confirm the payment plan amount and customer charged.
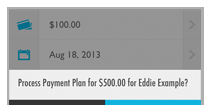
Tap CHARGE to save and activate the schedule, or CANCEL to return to the Collect Payment screen without saving the schedule.
It may take a few seconds for the schedule to save, during which time you’ll see the “Processing...” icon.
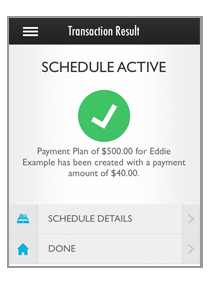
When the schedule has been
activated, you’ll see the Transaction
Result screen. The message will indicate the amount of
the full payment plan, the amount of each individual payment, and
the customer charged.
NOTE: If you have entered a Custom First
Payment that amount will be taken into account when calculating the
individual payment amount. The scheduled payment is calculated as:
(Plan
Amount - Custom 1st Payment)/# of Payments.
So for this example, a $500 plan with a $100 custom first payment and
10 scheduled payments has a payment amount of $40.
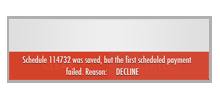
NOTE: If the schedule activation is unsuccessful, you will see an error
message describing the problem at the bottom of the Collect Payment screen.
Note that if everything but the initial transaction on the schedule
was successful, as in the screen capture below, the schedule will
be saved. You will need to access the schedule from the web-based
UI to change the payment account or to suspend it so that you can
enter a new schedule.
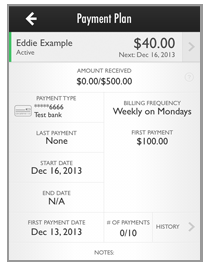
Tap the SCHEDULE DETAILS button to view the Payment Plan details screen. From this screen you can review full details for the schedule, as well as access the transaction Details for a scheduled payment or Custom 1st Payment, that was executed when the schedule was saved. Tap the back arrow to return to the Transaction Result screen. (See View Schedule Details below for more information.) A sample Payment Plan schedule details screen is shown below:
Tap DONE to return to a blank Collect Payment screen from which you can process your next payment or enter a new schedule.
Once a schedule has been activated it cannot be edited, suspended, or deleted from the Mobile App. However, it will be immediately visible in the web-based version of ReceivablesPro. From the web-based UI you will have access to all of these functions.
