![]()
![]()
With the ReceivablesPro Mobile App you can simply swipe a credit card to create a new Customer Record, save a new payment account, and process a payment in one easy step. When a Customer Record is created via swipe, it contains only data that can be extracted from the magnetic strip on the back of the card-- Customer First Name, Customer Last Name, Company (if applicable), Card Number, and Expiration date. This means that swipe-created Customer Records will not contain a billing address, nor will they contain contact information such as phone number or email address.
After a swiped transaction
for a new customer is authorized, you will have the option to enter an
email address and email a receipt. The email address you enter in this
step will be saved with the Customer Record. If you want to add additional
customer information, you will need to edit the Customer Record. (See
Edit
Customer Records for instructions.)
NOTE: If you swipe a transaction for an existing
customer for which the system has an email on file, the receipt will be
sent automatically. However, you can enter a new email address on the
confirmation screen, and resend the email if necessary.
Follow the steps below to swipe a card to process a one-time payment:
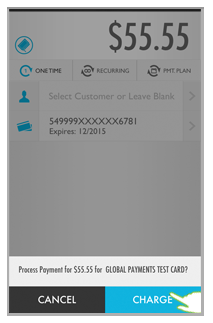
Tap Collect Payment in the Quick Menu to open the Collect Payment screen.

Attach the ReceivablesPro card swipe device (if it is not already attached). The swipe icon will turn color as shown below.
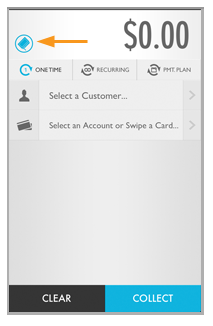
Enter the Payment Amount by tapping the $0.00 Amount field and using the keypad to enter the amount you want to charge. Then tap the close keypad icon to return to the Collect Payment screen.
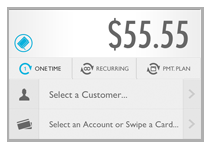
Swipe the card.
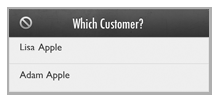
If the swiped card number is attached to more than one Customer Record, which might happen if a customer makes multiple online payments without logging in or if two people are authorized to use the same credit card, select the one you want to associate with the payment from the Which Customer? screen.
Otherwise, just confirm that the card information has been recorded.
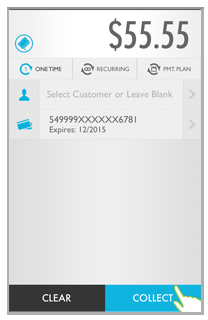
Tap Collect.
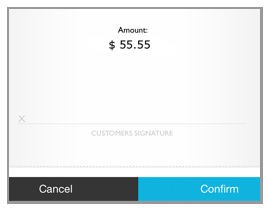
The main screen will grey-out, and a confirmation message will appear at the bottom. Tap Charge to submit the payment, or tap Cancel to discard it.
The signature screen opens. Hand
the mobile device to your customer and have them use a finger to sign
on the line and then tap the Confirm
button to authorize the transaction.
NOTE: For transactions under $25, the
customer does not need to provide an authorization signature, and
you will not see the signature screen.
NOTE: For swipe transactions processed as MOTO (card not present),
a signature is not required. Providing your customer the ability to
sign for and confirm the transaction is currently cosmetic and included
to help them feel more comfortable about the mobile payment. If you
do not want to use this feature, it is fine to omit the signature
and simply tap the Confirm button on the screen yourself to complete
the transaction.
The Transaction Result screen. screen opens and indicates whether your transaction was authorized or whether it failed.
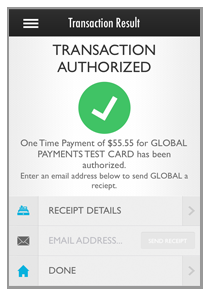
Tap RECEIPT
DETAILS to see complete transaction details. Tap the back
arrow in the top-left corner to return to the Transaction
Result screen.
NOTE: If you need to void the payment
you can to it from this screen by tapping the Actions icon in the
top-right corner. (See Void Payments
for instructions.)

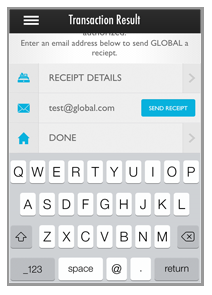
To send an email receipt, (if the
screen does not indicate that one has been sent already, or if it
has been sent to an incorrect email address), enter an email address
and tap the SEND RECEIPT (or RESEND
RECEIPT) button. Or tap DONE to
return to a blank Collect Payment screen
without saving an email address for the Customer, and without sending
a receipt email.
NOTE: Payment processing rules require
you to provide your customer with a receipt unless the customer actively
declines to receive it. Thus, if you do not have an email address,
and your customer wants a receipt, you will need to be able to provide
it in some other way. (You can print the Transaction
Details page from the web-based
ReceivablesPro interface
and mail or fax it to your customer, if necessary.) If your customer
declines to provide an email address and waives the receipt, it is
fine not to send one.
NOTE: If you have processed payments for the customer previously, there
may already be an email address entered in the EMAIL field.
Tap the field to enter a different one. Any email address you enter
in the EMAIL field will be saved as the default email address for
the Customer Record, and will overwrite any existing email address.
You will be able to access details about this transaction from the Payments screen at any time (See Payments). You will also be able to edit the Customer Record from the Customers screen (See Customers); and you will be able to enter additional payments and schedules for this customer by selecting it in the Collect Payment screen.