![]()
![]()
One-time credits are available for credit cards only. They are typically used when you want to issue a partial credit to a customer or if you want to refund multiple credit card payments with a single credit transaction. If you want to refund a single payment in its entirety, use the Refund function instead. (See Refunding Payments for instructions on how to do this.)
Follow the detailed instructions below to enter a standalone credit.
Navigate to the Payments--> Collect New Payment screen by clicking the “Collect Payment” Quick Link in side navigation.
Search for and
load an existing customer. (See
Loading and Entering Customers for New Payments
and Schedules above.)
NOTE: Credit card
processing rules state that you can only issue a credit for up to
the original payment amount (s), and that you cannot credit a card
for more than you have charged against it. Thus, you should only use
the standalone credit function for existing customers and stored credit
cards.
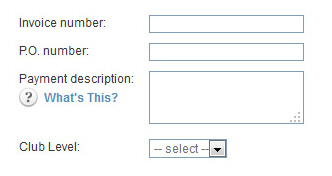
In
the right-hand section, shown below, you will always see the three
standard fields: Invoice number,
P.O. number, and Payment
description. Additionally, if you have configured any custom
fields for payments, they will appear below the standard fields, as
shown. You can enter values in these fields if they apply to the credit.
NOTE: The Invoice
number field CANNOT be used
to attach a credit to a ReceivablesPro system
invoice. Even if a valid Invoice # is entered, the credit will not
cause a deduction in the invoice “Balance Due.” However, the number
entered in the field will be displayed in the Invoice # column
of the Payments table.
Enter the amount you are crediting in the Payment amount field. Enter an amount in the format of 0.00. Do not include the $—The system will automatically add that for you.
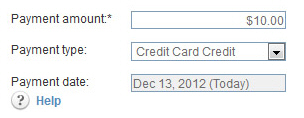
In the Payment type drop-down box, select “Credit Card Credit.”
The Payment date field will display the current date and will not be editable. You can only issue credits for the current day.
The Choose a payment method section will display the saved credit cards for the active customer.
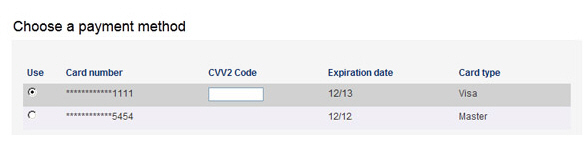
Click
the Use radio button
for the card you want to credit. As this is a credit transaction,
there is no need to enter the CVV2 Code.
NOTE: The default credit card will be
automatically selected—Do not assume that the system is indicating
the credit card account you should credit. (See
About Default Payment Accounts in Chapter 6 for details on setting
and changing the default credit card account.)
Review
the Email Receipt settings for the credit and make any required changes.
The settings in this section are based on the Receipt
and Notification settings you set in the Settings-->
Configuration--> Email Preferences and Templates screen.
(See Email Preferences and Templates in Chapter 8 for
details on how to configure receipt settings.)
NOTE: This is a receipt for the credit,
even though the screen displays “Payment receipt.”
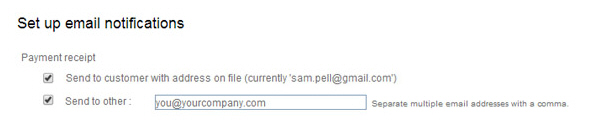
Depending on your default settings, you can:
Check or un-check the first and/or second box if you don’t want to send the receipt to the listed email address.
Enter a different email address in the
Send to other field
or add an additional address to the field. You can enter multiple
addresses separated by commas. (Maximum 200 characters)
NOTE: If you have also elected to
send a receipt to the customer, the email address(es) entered
in the Send
to other field will
be the email CC addresses. If the send to customer box is not
checked, then email addresses in this box will be placed in the
email To field.
You
can ignore the Failure notification settings.
The system does not send a notification to your customer if a refund
attempt fails. (Refund failures after authorization are extremely
remote occurrences.)
NOTE: Even though the checkboxes are
checked no failure email will be sent.

Click the “process credit” button at the bottom right of the screen to submit the credit. Or, click the “cancel” button to discard it.

If there are any errors with the transaction you will see an error message displayed at the top of the screen as well as a detailed explanation at the point of the problem. You can then make corrections and re-submit the credit transaction or discard it.
When the credit is authorized, the manage payments screen will appear. There will be a message above the table verifying that the credit was successfully posted. The new transaction will be at the top of the payments table, as shown below.
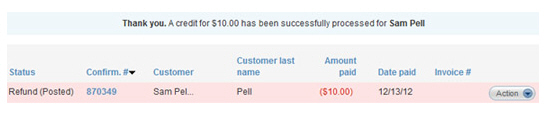
The first column will display the payment Status as “Refund (Posted).” Once the credit transaction has been submitted for processing and the funds have been debited from your account the Status will change to “Refund (Settled).”
The Confirm. # column will display the transaction confirmation number, referred to as the Transaction ID in reports and on the Transaction Details screen.
At this point, you can view or print transaction details by clicking the Confirm. # link or selecting “View transaction details” under the Action button. You can also void the transaction by selecting “Void” under the Action button. (See Viewing Transaction Details, Printing Payment Details, and Voiding Transactions for detailed instructions on performing these tasks.)