![]()
![]()
Payment details for any given transaction can be accessed in two ways:
Click a linked Confirm. # in the Payments table, or in any other table or report where it is linked.
Select the “View transaction details” link under the Action button in the Payments table.
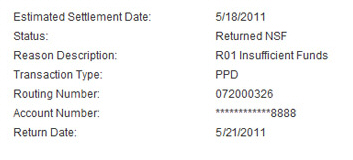
A sample of the Transaction Details screen is shown below. Key components include:

Transaction
ID-- This is the unique identifier ReceivablesPro attaches
to the payment. This number is the same as the Confirm.
# in the Payments
table.
NOTE: Payments generated by schedules
will always have a Transaction ID that begins with an “R.”
Authorization Code-- The authorization number provided by the Credit Card or ACH processor when the payment is approved for processing. This is the unique identifier the Processor attaches to the payment.
Amount-- The amount of the transaction. Payments will appear positive, and credits or refunds will appear negative.
Status-- The status of the payment. (See Filter by Transaction Status above for Status definitions.)
Reason Description-- This field provides an explanation for a transaction Status.
If Status = “Settled” or “Authorized” or “Posted” Reason Description = “Approved.”
If Status = “Returned” or “Returned NSF” Reason Description = the ACH Return Code which indicates why the transaction failed. (See Appendix B: ACH Return Codes.)
If Status = “Failed” Reason Description= a brief reason why.
If Status = “Chargeback” Reason Description = ACH Return Code.
Can Void Until-- This date indicates when the transaction will be submitted for processing. You will be able to void it at any point PRIOR to the listed date. You will know if a transaction can be voided if you see the “void” button on the transaction details page (see #12 below).
Transaction Type-- For credit card
transactions this field indicates that the transaction is MOTO (Mail
order/telephone order) or Swipe (A card-present transaction for which
you swiped the credit card). For ACH transactions, it indicates the
ACH Type used (TEL, PPD, CCD, WEB).
NOTE: You will see the “Swipe” type only
if your credit card merchant account is configured to process true
card-present Retail transactions. If it is not, all of your credit
card transactions will have the “MOTO” type, even if you swiped the
card to enter them. All scheduled credit card transactions, regardless
of card entry method, will use the “MOTO” type.
Invoice #-- The invoice number attached to the payment. If the invoice number is for an invoice sent from ReceivablesPro it will be linked (as in the example above) and you can click it to view the invoice.
Customer ID-- The linked ID for the customer who made the payment. You can click this link to view the complete Customer Record.
Custom Fields-- Any custom fields attached to the Payment module or the Customer module will appear in this section. (See Custom Fields in Chapter 8 for more information on creating custom fields.)
“email transaction” button-- Click this button to open a pop-up window so you can enter any email address to which you want to send the transaction details. This is very useful if a customer asks you to send a copy of a payment receipt.
“void”
button-- This button will only be visible if the transaction
status is “authorized” for credit card transactions or “posted” for
ACH transactions, and if the “Void until” date has not yet passed.
Click it to void the transaction.
NOTE: For “settled” transactions a “refund”
button will replace the “void” button.
“return to transaction list” link-- Click this link to return to the transaction table you were viewing prior to opening the transaction details page.
Email History-- This table displays all emails sent in relation to the transaction. You are shown the date the email was sent, the email address to which it was sent, and the linked subject line of the email. Clicking the linked email subject line opens a pop-up window containing the full text of the email sent. (Click the OK button to close the pop-up.)
Action links
“create similar transaction” Click this link to open a collect new payment screen with the details of the current transaction pre-loaded. Use the copy to create a new payment for the same customer or a different customer. (See Creating Similar Transactions below.)
“print” Click this link to print a copy of the transactions details. (See Printing Payment Details below.)
“print receipt” Click
this link to print a copy of a transaction receipt for your customer
to sign. You are initially prompted to do this after submitting
a swiped transaction (whether that transaction is processed as
true Retail swipe, or as a MOTO transaction). You can also use
this link to print a receipt at any time from the Transaction
Details screen.
NOTE: The ability to print a receipt
will continue to be available even if you Void the transaction,
it fails, or was refunded.
NOTE: The “print receipt” link is included on all Transaction Details screens, not just those for swiped
credit card transactions. So, feel free to use it to obtain written
authorization for your PPD or CCD e-check (ACH) payments.