![]()
![]()
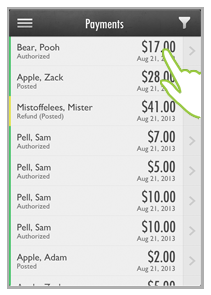
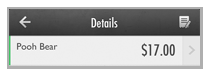
You can view the Details screen (receipt screen) for any transaction in the Payments list by tapping its line.
The Details screen opens, as shown below.
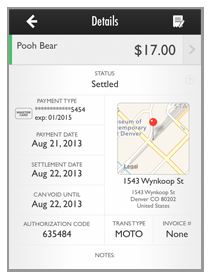
Each element on the Details screen is defined below:
Back Arrow: Tap the back arrow to return to the Payments list you were viewing prior to opening the Details screen.
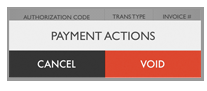
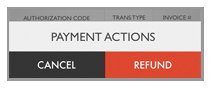
Actions Icon: Tap the Actions icon, located in the top-right corner of the Details title bar to access Void and Refund functions.
When you tap the Actions icon
only the function available will be shown. If no functions are available,
the Actions icon will
not be displayed. (See Void Payments and Refund Payments below for details
on those functions.)
Customer Name: The customer’s first and last name. If the customer is from a company, the Company Name will be displayed below the contact name
You can tap the bar to open the Customer Details screen. (Use the back arrow on the Customer Details screen to return to the Transaction Details screen.) For more information on the features and functions available from the Customer Details screen, see the Customers section below.
AMOUNT: The amount of the transaction.
NOTE: All amounts are shown as positive
values. To determine whether an transaction amount is positive or
negative, refer to the status. Transactions with a status of “Refund
(Posted)” or “Refund (Settled)” are credit (negative) amounts.
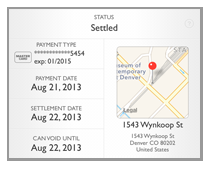
STATUS: The current Status of the transaction. See The Status Filter above for detailed descriptions of all statuses.
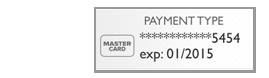
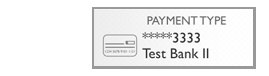
PAYMENT TYPE: An icon will indicate whether the payment account is Visa, MasterCard, American Express, Discover, or E-check (ACH). The information displayed depends on the type of account.
Credit Card: The last 4 digits of the card number are shown to the right of the icon, along with the credit card expiration date underneath.
Bank Account: The last 4 digits of the bank account number are shown to the right of the icon, along with the bank name underneath.
For transactions that have settled at any point, (even those that were later refunded or returned), this is the actual settlement date.
If transaction Status is “Authorized” or “Posted” or “Refund (Posted)” this field will be “None.” as the transaction has yet to settle.
If transaction Status is “Failed” or “Voided” this field will be “None.”
CAN
VOID UNTIL: This date indicates when the transaction will be
submitted for processing. You will be able to void it at any point
PRIOR to 5PM Eastern on the listed date.
NOTE: This is usually the same day that
you entered the payment or credit. But in some cases such as weekends
or holidays, it may be several days in the future. The date will be retained in this field, even
after it has passed.
AUTHORIZATION CODE: The authorization
code issued by the credit card or ACH payment processor.
NOTE: For failed credit card transactions
this field includes a two digit number that identifies the specific
failure reason. See Appendix G: Credit Card Failure Codes for help with these codes.
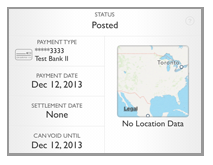
Location Map:
This field displays a map, along with the address, of exactly where
you were when you processed the payment-- if the payment was processed
on a mobile device. For all payments processed via the web-based UI,
and for all scheduled payments, this field will have “No Location
Data.”
If location data is saved, you can tap the map to open Google Maps
with the location pinpointed.
Transaction Details with a saved location.
Transaction Details without a saved location.
ACH: The
ACH Type for the transaction, depending on how it was authorized
(PPD for written, TEL for telephone, WEB for online, and CCD for
business-to-business transactions.)
NOTE: All ACH transactions entered
via the Mobile App will use the WEB type.
Credit
Card: This field will be “SWIPE” if you swiped the
credit card to enter the payment AND your merchant account is
enabled for Retail credit card processing. This field will always
be “MOTO” if you hand-keyed the card number or if you selected
a saved credit card. It will also be “MOTO” if you swiped the
credit card but your merchant account is not enabled for Retail
processing.
NOTE: Please contact Customer Care
if you would like to enable your MOTO merchant account for Retail
processing rates.
INVOICE #: The invoice number attached
to the payment. This can be a ReceivablesPro system
Invoice Number, or your own invoice number entered when the payment
was created.
NOTE: You cannot enter an Invoice # in
the Mobile App. But if it gets attached to the payment when a customer
pays an invoice online, or it gets entered via the Web-based UI, it
will be displayed here.
NOTES: You cannot access the NOTES field when entering a payment via the Mobile App. However if you enter a value in the Payment Description field when processing a payment via the web-based UI, that value will be visible in the NOTES field when the payment Details are viewed from the Mobile App.