![]()
![]()
The ReceivablesPro Android Mobile App makes Retail Point of Sale payment processing easy. You can simply swipe a credit or debit card to create a new Customer Record, save a new payment account, and process a payment, in one easy step. When a card is swiped the system searches for that card number in your Customer database. If it finds it, the transaction is attached to the existing Customer Record. If it does not, then a new Customer Record is created.
When a Customer Record is created via swipe, it contains only data that can be extracted from the magnetic strip on the back of the card-- Customer First Name, Customer Last Name, Company (if applicable), Card Number, and Expiration date. This means that swipe-created Customer Records will not contain a billing address, nor will they contain contact information such as phone number or email address.
After a swiped
transaction for a new customer is authorized, you will have the option
to enter an email address and email a receipt. The email address you enter
in this step will be saved with the Customer Record. If you want to add
additional customer information, you will need to edit the Customer Record
in the web-based application. (See Editing Customer Information in Chapter 6
for instructions.)
NOTE: If you swipe a transaction for an existing
customer for which the system has an email on file, the receipt will be
sent to that address automatically.
Follow the steps below to swipe a card to process a one-time payment:
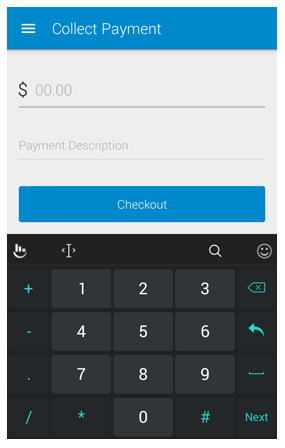
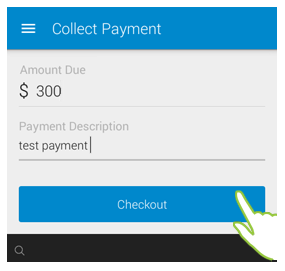
The Android App opens to a blank Collect Payment screen, with the number pad open, by default.
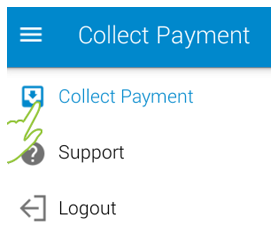
If you are on a different screen, you can tap Collect
Payment in the Menu to
open the Collect Payment screen.
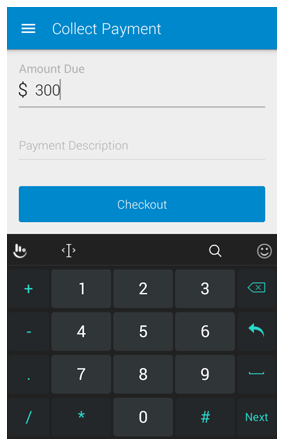
Enter the transaction Amount Due in the first field, after the “$”
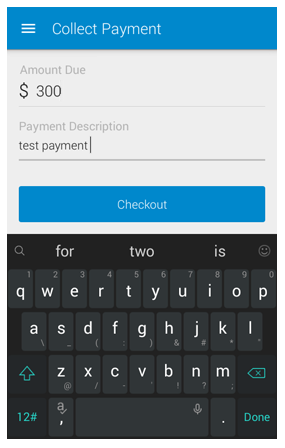
Optionally,
enter a Payment Description.
NOTE: This will be placed in the Payment Description field for the transaction, and may be
printed on receipts and other transaction reports.
Tap Checkout.
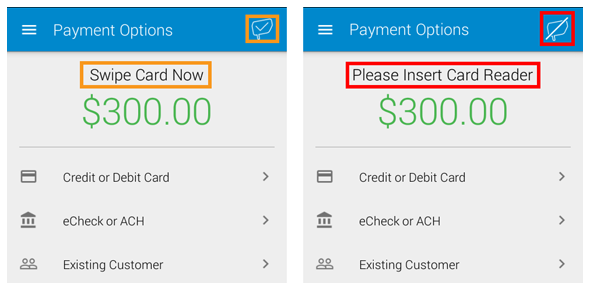
The Payment
Options screen opens, with the transaction amount indicated
in big green numbers at the top of the screen.
NOTE: If the amount is incorrect, use
your device “back” function to return to the previous screen and correct
it.
Attach
the ReceivablesPro card
swipe device (if it is not already attached). The “Swipe Card Now”
message and the swiper active icon will be shown on screen if the
device is properly installed and ready to use (as shown below left),
if the swipe device is not installed or not recognized, the “Please
Insert Card Reader” message and the swiper inactive icon will be shown
on screen (as shown below right.)
NOTE: See Installing the Card Swipe Device for detailed instructions.
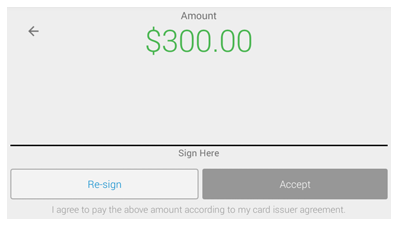
Swipe the card.
If there is an error reading the card, a “please swipe again” message will appear at the bottom of the screen. You do not need to dismiss it, simply swipe the card again, until you see the “Processing” message appear.

If the transaction amount is greater
than $25, the signature screen opens. Hand the mobile device to your
customer and have them use a finger to sign on the line and then tap
the Accept button to authorize
the transaction.
NOTE: Tapping Re-sign
clears the signature and enables
your Customer to sign again (in case they are not happy with the initial
signature.)
NOTE: For transactions under $25, the
customer does not need to provide an authorization signature, and
you will not see the signature screen.
NOTE: For swipe transactions processed as MOTO (card not present),
a signature is not required. Providing your customer the ability to
sign for and confirm the transaction is currently cosmetic and included
to help them feel more comfortable about the mobile payment. If you
do not want to use this feature, it is fine to omit the signature
and simply tap the Accept button on the screen yourself to complete
the transaction.
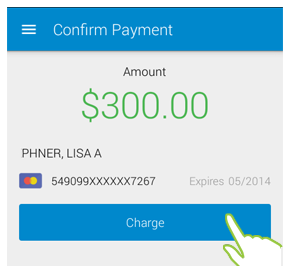
The Confirm Payment screen opens with the payment Amount displayed on top, and the information extracted from the card’s magnetic stripe displayed below it as follows:
The customer’s full name, in the format of Last Name, First name.
An icon for the card type (in the screen capture below, the card is a MasterCard)
A redacted version of the credit/debit
card account number (the first six and last four digits are displayed.)
NOTE: You should double check this
against the card itself, just to be sure there are no errors.
The credit card expiration date (to the right of the card number)
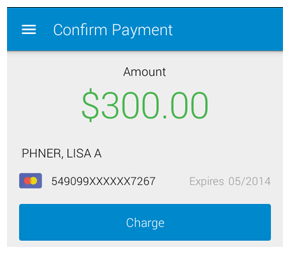
Once you’ve confirmed all is correct, tap Charge.
The Payment Confirmation screen displays the transaction result.
For a successful payment, when the system has determined that the card has been used before and is attached to an existing Customer Record, a receipt is automatically sent to the email address of record. This is indicated on the confirmation screen as shown.

For
a successful payment for a new customer (or for a new payment
card that the system does not recognize), you are provided the
option of entering an email address and sending a receipt or skipping
this step.
NOTE: To skip the receipt, tap Skip and
you will go to the Payment
Complete screen with
a “Done” message. Tap New
Sale to return to a
blank Collect
Payment screen. (See steps
iii and iv below)
To send the receipt:
Enter an Email Address in the field provided.
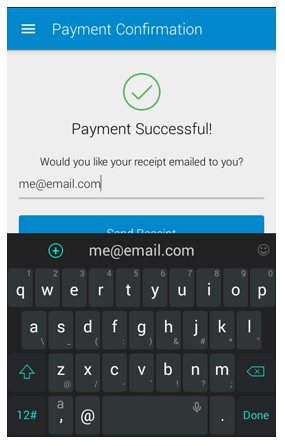
Tap Send Receipt.

The Payment Complete screen opens with a “Receipt Sent” message displayed.
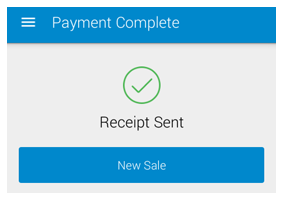
Tap New Sale to close the message and return to a blank Collect Payment screen.
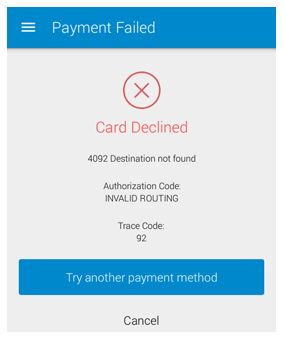
For a failed payment, the Payment Failed screen will be displayed along with the failure code and additional information about why the payment failed. Tap Try Another Payment Method to return to the Payment Options screen (Step 6), where you can swipe a different card or key-enter credit/debit card or bank account information. Or tap Cancel to abandon the transaction and return to a blank Collect Payment screen.
Once you have dismissed the Failed Payment or Payment Confirmation screen you will not be able to access this information again from the Android Mobile App. (You may be able to use the device “back” function to get there if you are still in the same session-- though if you do this, be careful not to inadvertently process duplicate transactions.) However, all transactions processed in the Android Mobile App are immediately visible in the web based interface. To view full transaction details, go to the Manage Payments screen. (See Viewing Transaction Details in Chapter 4 for detailed instructions.)
Next Section: Manual Credit/Debit Card Payment Processing >