![]()
![]()
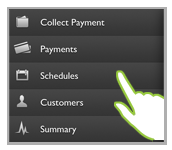
The Schedules screen provides a list of all your recurring billing and payment plan schedules. The list includes schedules entered via the Mobile App as well as those entered via the Web-based application.
Tap Schedules in the Quick Menu to open the Schedules screen.
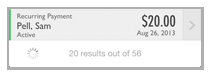
The default screen view is to show all Active schedules sorted by Next Payment Date, with those that will generate a schedule on the next day listed first, starting with the first 20.

Scroll to the bottom of the list and drag the last entry up to see which set is displayed. Release to add the next 20 schedules to the visible list.
NOTE: The default view for the schedule screen is to set the Status filter to “Active.” Tap “Schedules” in the Quick Menu to return to this view at any time. To view all schedules, tap the filter icon and then clear the filters. (See Filter The Schedules List for detailed instructions.)
Schedules are color coded, with bars to the far left of the transaction row, that indicate status as follows:
Green: Active
Yellow: Suspended (indefinitely, or with a defined resume date)
Red: Expired
Each entry in the list includes the following components:
The Type of Schedule it is. (Recurring Payment or Payment Plan)
The Customer for which the schedule was entered. (Last Name, First Name)
The Schedule Status
The Amount of each recurring payment.
NOTE: Information about Custom First
Payments is not included in the Schedules list view.
The Next Payment date. (The date on which
the schedule will next generate a payment.)
NOTE: For “Expired” schedules, Next Payment
Date will be “None.” For indefinitely “Suspended” schedules Next Payment
Date will be “None.” For “Suspended” schedules paused until a specific
date, the Next Payment date will indicate the next date after the
suspension ends that the schedule will generate a payment.
To refresh the list, so that it includes the most recent activity, including schedules entered via the Web-based UI and those entered by your customers online, drag down the top of the screen until you see the refresh message. When you see this message, release the screen and the Loading... message will display as shown below. The message will disappear once the list has refreshed.
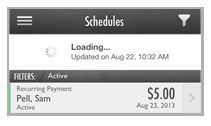
You can filter the schedules list on the Schedules screen by Customer, Date, and Status as well as by a combination of those filters.
You can also access the Details screen for individual schedules. This is a view only screen. If you want to make changes to schedules, suspend them or resume them, you can do so via the Web-based application.
Both of these functions are described in the following sections. You can click on the Next links located at the bottom of each screen to read through the entire section. Or click one of the links below to jump to a particular area of interest.
Next Sections