

You can add an unlimited number of Web Payment Pages to your ReceivablesPro account. Watch this 8 minute video tutorial to see how to create a new Web Payment Page. Detailed step-by-step instructions follow below.
|
Before releasing a Web Payment Page link, or a Web Payment Button, to your customers it is very important that you run a test transaction on the Web Payment Page first. You need to do this even if you are using the Default Web Payment Page. In the unlikely event of a configuration problem with your account, there will be no record of failed transaction attempts made via Web Payment Pages. By testing each form before providing it to your customers, you ensure that you will not encounter any problems or lose any customer orders. |
Follow the steps below to create a new Web Payment
Page.
Click the “add new payment form” link under the WEB PAYMENT PAGE TEMPLATES table, on the Web Payment Page dashboard.

The New Payment Page Template screen opens as shown below:
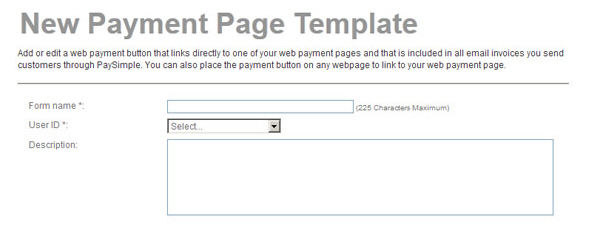
Enter a Form name. This is the Form name that will appear in the WEB PAYMENT PAGE TEMPLATES table, and in the drop-down box for selecting a Web Payment Page to use with a Web Payment Button. (See Add a New Web Payment Button below.)
In the User ID drop-down box, select the user in your ReceivablesPro account to which you want to attach the form.
Enter a Description for the Web Payment Page. (Optional)
In the PAYMENT OPTIONS section:
Check
the boxes for each type of payment you would like to accept from
the form.
NOTE: If your account is configured
for only ACH you will not need to make a selection; if it is configured
for Credit Card only, you will just need to select card types.
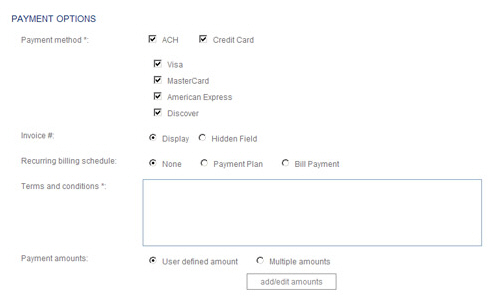
Check the ACH box to accept Echeck (ACH) payments.
Check the Credit Card box to accept credit cards, then check the box for one or more card types. You can accept Visa, MasterCard, American Express and/or Discover.
In the Invoice # field, select the “Display” radio button to include the Invoice # field on the payment form, or select the “Hidden Field” radio button to hide it.
Select the “None” radio button to accept only one-time payments.
Select the “Payment Plan” radio button to enable creating a payment plan schedule via the form, or to accept a one-time payment.
Select the “Bill Payment” radio button
to enable creating a bill payment schedule on the payment
form, or to accept a one-time payment.
NOTE: You cannot use a single
payment form to create both a payment plan and a bill payment
schedule.
In
the Terms and conditions text
area, enter detailed terms and conditions of sale. Make certain
that the Terms and conditions you
enter meet all requirements for Echeck (ACH) and/or Credit Card
payments, as well as any terms and conditions specific to your
business.
NOTE: See Appendix
A: Authorizing Transactions for
sample Terms and Conditions to use on web payment forms.
In the Payment amounts field, select whether you want customers to enter a payment amount, or whether you want to control the payment amounts that can be entered on the form.
To create a payment form in which customers can enter any amount in the Payment amount field:
To create a payment form with a single fixed Payment amount:
Select the “Multiple amounts” radio button.

Click the “add/edit amounts” button.
The amounts pop-up window opens.
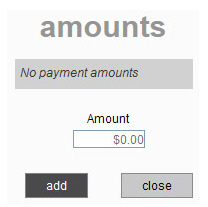
In the Amount field, enter the amount you want to use for the payment form.
Click the “add” button.
The
amount you just added will now be displayed in the table,
as shown below:
NOTE: If you want to change
the amount, click the “delete” link to the left of the
existing amount to remove it. Then enter the new amount
in the Amount field, and click the “add” button
to add it.
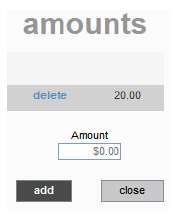
Click
the “close” button to close the amounts pop-up
window and return to the Web
Payment Page Configuration screen.
NOTE: When your customers
access this payment form, they will see the amount you
entered displayed in the Payment
amount field, and
they will not be able to edit it.

To create a payment form with a drop-down box in the Payment amount field from which customers can select one of several fixed amounts to pay:
Select the “Multiple amounts” radio button.

Click the “add/edit amounts” button.
The amounts pop-up window opens.
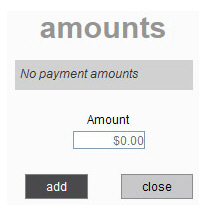
In the Amount field, enter the first amount you want to use for the payment form.
Click the “add” button.
The amount you just added will now be displayed in the table above the Amount field and the Amount field will reset to “$0.00.”
Enter the next amount you want to use for the payment form in the Amount field.
Click the “add” button.
That
amount will now appear in the table as well.
NOTE: Regardless of the order
in which you enter amounts, they will always be listed
from lowest-to-highest in the table and in the payment
form drop-down box itself.
Repeat
steps 7 and 8 to add additional amounts.
NOTE: If you want to remove
an amount from the drop-down box, click the “delete” link
to the left of it.
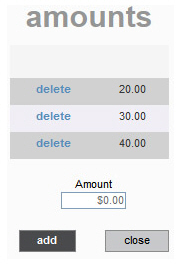
Click
the “close” button to close the amounts pop-up
and return to the web
payment page configuration screen.
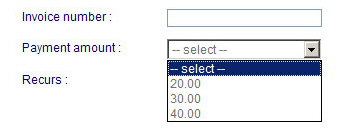
NOTE: When your customers
access this payment form, they will see the amount you
entered displayed in the Payment
amount field
as a drop-down box. The lowest amount will be selected
by default, and they can select any one of the other amounts.
Customers will not be able to enter a custom amount.
|
You
can use a single fixed payment amount, or a payment amount
drop-down box for one-time payments and for recurring bill
payment schedules. |
In the Standard fields section of the TEMPLATE FIELDS section, select the “Yes” radio button to include shipping fields in your payment form, or select the “No” radio button if you don’t want to include them.

In the Additional fields area of the TEMPLATE FIELDS section, add any custom fields that you would like to include on the payment form. You can select custom fields attached to both the Customer and Payment modules.
Click
the “add another field” link located under the Additional
fields table.

A line
for a new field will appear in the table.

From the drop-down box in the Field name column, select the custom field you want to add to the payment form.
If you want to stop the form from being submitted without a value being entered for the field, check the box in the Required field column. If you want the field to be optional, leave the box unchecked.
If you
want the field to be included in the data captured on the form,
but you do not want the field to be visible on the form, check
the box in the Hidden field
column.
NOTE: This box should only be checked
if you have programmed a default value for this field that you
want to appear on the Transaction
Details screen and/or on
receipts, but do not want it included on the payment form. Therefore,
this setting should only be used for a Text or TextArea custom
field, as only those two field types can be programmed with default
values.
In the
Field type column
select the “Input” radio button if you want customers to enter
a value in the field on your payment form. Select the “Display”
radio button if you want the field’s default or current value
to be displayed on the form, but not edited.
NOTE: The “Display” option can be
used with Text and TextArea custom fields attached to the Payment
module, but only if default values have been defined for the fields.
It can also be used with any field type attached to the Customer
module, but will only display a value for existing customers.
The field will be blank for any customer who accesses the payment
form without logging in.
In the Order column,
enter the order in which you would like the fields to appear on
the payment form.
NOTE: You must enter “1” in the box
for the first field you add to the payment form. After adding
additional fields you can change the order by editing the numbers
in the Order column for each field.
Click the “add” link in the new field row to add it to the form. After you click the “add” link the new field will appear in the table. Repeat steps a - g to add additional fields to the payment form.

You can delete any field in the Additional fields table by clicking its “delete” link, and you can edit any settings for the field by making changes in the table.
Customize the logo, text, and colors used in your payment form and receipt screen by configuring the fields in the FORM CUSTOMIZATION INFORMATION section. All fields in this section are optional. If you do not complete any or all of them, default text and colors will be used to create the payment form.
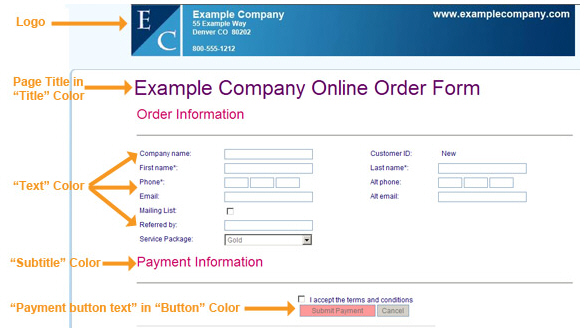
In the Page title field, enter the heading you want at the top of the payment form. For example, in the above sample screen capture, the Page title is “Example Company Online Order Form.” You can enter a maximum of 225 characters in this field.

Upload a banner logo to use at the top of your payment form. The graphic will be left justified.
In the
Page logo field click
the “Browse” button to locate your logo file on your computer
and select it.
NOTE: In the Google Chrome browser,
the button will say “Choose File” and will be to the left
of the field.
NOTE: The file must be in JPG, PNG or GIF format. You can upload
any size image (as long as it is under 150 KB), but it will
be proportionately resized to be 90 pixels high.
Click the “upload” button to upload the logo to ReceivablesPro. When your logo is successfully uploaded you will see the file name under the button, as shown below. You will also see a “remove” button. Click it to remove the logo.

Configure the text settings for your payment form.

Enter Return page text. This text will appear as a link on the confirmation screen your customers see after successfully completing a payment via your payment form. It is used in conjunction with the Return page URL, which is the destination for the link. You can enter up to 50 characters.
Enter Return page URL. Enter
the complete url (including the “http://”) for the exact web
page to which you want to direct customers after they have
viewed your payment confirmation page.
NOTE: This url IS NOT
case sensitive.
Enter Payment button text. This is the text that will appear on the button at the bottom of the page that customers click to submit the payment form. For example, in the above screen capture, the button reads “Submit Payment.” You can enter up to 25 characters.
From the Font drop-down box, select the font face you want to use in the payment form. You can select from Arial, Comic Sans, Georgia, Times New Roman and Verdana.
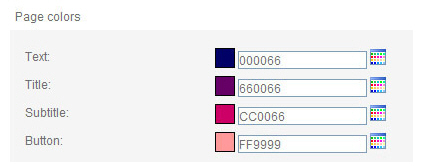
Configure the color settings for your payment form. See the screen capture above for a legend depicting how the colors are used.
In the Text field, click the color palette icon to the right of the field to open a group of color swatches. Click on the color swatch you want to use for the main text color in the payment form.
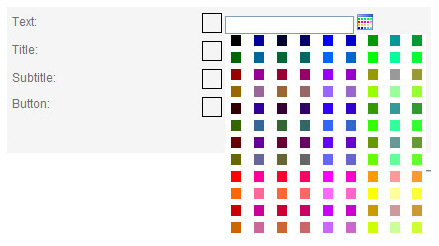
Alternately, enter any HEX color code in the field. (For example,
000000 is the HEX code for black.)
You will see the swatch you selected next to the Text field.
(If you entered a HEX color, the swatch will reflect that
color.)

In the Title field, click the color palette icon to the right of the field and select a swatch from the color palette, or enter a HEX color code.
In the Subtitle field, click the color palette icon to the right of the field and select a swatch from the color palette, or enter a HEX color code.
In
the Button field,
click the color palette icon to the right of the field and
select a swatch from the color palette, or enter a HEX color
code.
NOTE: The text in the button
will always be light grey. Be certain to select a button color
that does not prevent this text from being seen.
Complete
LOGIN PAGE CONFIGURATION by
uploading a login logo and selecting an accent color. Completing this
section is optional. If you do not configure either or both of these
fields, the default design will be used.
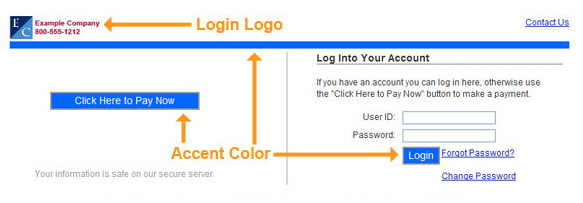
Upload a Login logo to use at the top of your payment form login screen. This graphic will be placed in the top left-hand corner of the screen.
In
the Login logo field
click the “Browse” button to locate the logo file on your
computer and select it.
NOTE: In the Google Chrome browser,
the button will say “Choose File” and will be to the left
of the field.
NOTE: The file must be in JPG, PNG or GIF format. You can upload
any size image (as long as it is under 150 KB), but it will
be proportionately resized to fit the screen.
Click the “upload” button to upload the logo image to ReceivablesPro. When your logo is successfully uploaded you will see the file name appear under the button, as shown below. You will also see a “remove” button. Click it to remove the logo.

Configure the Accent color for the login screen. This color will be used as the button backgrounds on the screen, as well as in the divider line, as shown in the legend above.
In the Accent color field, click the color palette icon to the right of the field to open a group of color swatches from which you can select the color you want to use. Alternately, enter a HEX color code in the field. (For example, 000000 is the HEX code for black.)
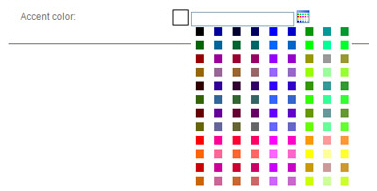
You will see the swatch you selected next to the Accent color field. (If you entered a HEX code, the swatch will reflect that color.)
Complete the CONTACT
INFORMATION section and provide the company name, address,
phone number, email and website to display on the payment form and
on the confirmation screen.
NOTE: Payment processing rules require
that you provide customers with contact information on the confirmation
screen for any online payment. You must provide a current address,
and an email address and phone number that are answered during regular
business hours. (See Appendix
A: Authorizing Transactions
for detailed online payment processing requirements.)
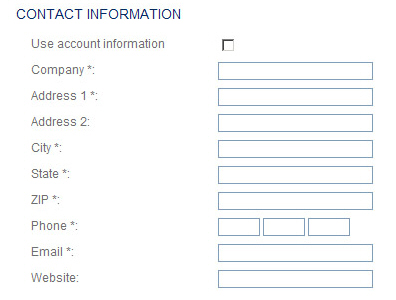
Check the Use account information box to auto-fill the CONTACT INFORMATION fields with the information stored in your ReceivablesPro account. (After checking this box, you can make edits to any field.)
Alternately, enter information specific to this payment form in the Company, Address 1, Address 2, City, State, ZIP, Phone, Email and Website fields.
Click the “save” button at the bottom of the screen to save the new payment form. Or click the “back to payment page & button list” link to discard the form.
You return to the Web Payment Pages dashboard with the new payment form at the top of the WEB PAYMENT PAGE TEMPLATES table.

You can now preview the payment form and login screen. (See Preview a Web Payment Page below.) If you are not satisfied, edit it to make changes, and then preview again. (See Edit a Web Payment Page below.)