![]()
![]()
You can create custom reports based on the transaction activity in your account. When creating a report you can configure the following report elements:
Fields to include-- Transaction fields, Customer fields, or both. You add individual fields to the report as required. (See Transaction Fields Available for Custom Reports and Customer Fields Available for Custom Reports below for detailed descriptions of available fields.)
Transaction Date Range -- Select a date range, and whether the range is for transaction Enter Date or Settle Date.
Transaction Type -- Credit Card transactions, Echeck (ACH) transactions, or both.
Watch this 4 minute video tutorial to see how to create a new custom report. Detailed step-by-step instructions are provided below.
Follow the steps below to create a new custom report:
Click the “add new custom report” button located directly above the standard reports table on the Reports dashboard.

The New Custom Report screen opens, as shown:
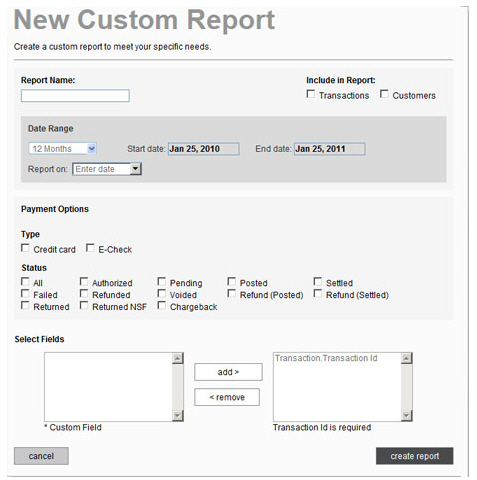
Enter a name for the report in the Report Name field. This is the name that will appear in the custom reports table.
In the Include
in Report section, check the
Transactions checkbox to include transaction fields, and/or
check the Customers checkbox
to include customer fields. As each box is checked, fields appear
in the bottom-left Select Fields
section.
NOTE: You must select at least one of
these checkboxes to create a custom report.
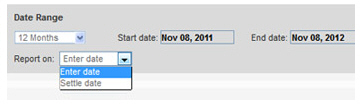
In the Date Range section, select the date range you want to use. The default selection is “12 months” which reports on all activity in your account for the most recent 365 days. (The dates covered are shown in the Start date and End date fields.) If you want to change the date range, follow the steps below.
First, select whether you want to base your report on transaction Enter date or transaction Settle date, and select that option in the Report on drop-down box. “Enter date” is the default.
Click the down-arrow for the Date Range filter.
The date filter will appear as shown below:
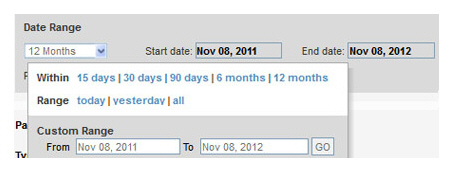
Select the date range:
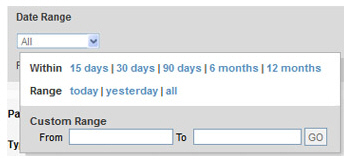
Click “all” to display all transactions in your system. When you do this the From and To fields in the Custom Date Range section will be blank, and the Start date and End date fields will be hidden, as shown below:
To
use a rolling date range, click the linked range definition.
For example, to view payments entered within the last 15 days,
click the “15 days” link. The filter screen will close and
you’ll see the range you selected in the drop-down box, and
the current set of dates that matches the filter in the Start date and End date fields. Each
time you run the report it will be filtered based on the rolling
range you selected.
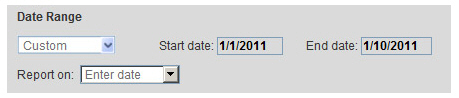
For example, in the screen capture below it is January 25,
2011 and “15 Days” is the selected rolling date range, so
the report Start date is
1/10/2011 and the report End
date is 1/25/2011. If you view or edit the report
two days later on January 27, 2011 the Start
date would be 1/12/2011 and the report End
date would be 1/27/2011.

To enter a Custom Date Range:
Place your cursor in the From field to open the calendar.
Click the day on which you want to start the filter, or type a date in the field.
Place your cursor in the To field to open the calendar.
Click the day on which you want to end the filter, or type a date in the field.
Click the “GO” button.
The
filter screen will close and you’ll see the Start
date and End
date fields populated with the dates you selected.
NOTE: The report will always
run using these exact dates. However, you can use the
Date
Range filter
while viewing the report to temporarily change the dates
included in the report view. (See Filtering
Custom Reports by Date below.)
If you do this, the next time you view the report it will
revert to the programmed date range. You need to edit
the report in order to permanently change the Date Range.
In the Payment Options section, select the Type of transactions you want to include in the report. You can select both boxes, but you must select at least one.
Check the “Credit card” box to include all credit card transactions for American Express, Discover, MasterCard and Visa.
Check the “E-Check” box to include all Echeck transactions for ACH Types of CCD, PPD, TEL and WEB.
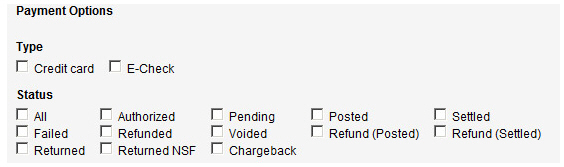
Check the Status checkbox for each transaction status you want to include in the report. You can select as many as you like, but you must select at least one. Selecting all of the status checkboxes will result in returning all transactions for the date range filter, as will selecting only the “All” box. The following transaction status filters are available:
All: All transactions in your account, regardless of status.
Authorized: Credit card payments that have been authorized, but not yet submitted for processing.
Pending: The initial stage for
every transaction sent for authorization. The system assigns this
status while waiting for an authorization response. In some rare
cases, if communication is disrupted before the system gets a
response, the transaction will remain in the “Pending” status.
NOTE: If you see a credit card transaction
with a status of “Pending” you can be assured that it failed and
was not submitted for processing. For ACH transactions, wait until
the Expected
Settle Date to see if
the transaction has settled or returned. If not, contact your
service provider so
that they can determine the actual status for the transaction.
Posted: Credit Card and ACH payments that have been entered in the system, but not yet settled.
Settled: Successful payments for which you have received funds.
Failed: Attempted payments that were never authorized or credits that could not be processed.
Refunded: A transaction that has been reversed (refunded). When you issue a refund for a settled transaction, the status of that transaction changes to “Refunded.”
Voided-- Any payment that was voided prior to it being submitted for processing.
Refund (Posted): The credit transaction generated (but not yet submitted in a settlement batch) when a settled transaction is refunded or when you process a standalone refund.
Refund (Settled): A settled refund transaction. When funds have been deducted from your account for a “Refund (Posted)” payment, the status changes to “Refund (Settled).”
Returned: ACH payments that were unsuccessful for reasons other than NSF or chargeback. The Reason Description field on the Transaction Details screen will display a return code for this payment, and there will be an entry in the Return Date field for the date the return was recorded. (See Appendix B: ACH Return Codes for more information on ACH Returns.)
Returned
NSF: An ACH transaction that failed because your customer
had insufficient funds in the account to cover the payment. The
Reason Description field
on the Transaction Details screen
will display an R01 return code for this payment, and there will
be an entry in the Return Date field
for the date the return was recorded.
NOTE: You can manually re-process
this payment again to attempt to collect.
Chargeback-- A payment being disputed by your customer.
In the Select Fields section, add the fields you want to include in your report. The fields you see are dependent upon your selection of transactions and /or customers in the Include in Report section in Step 4, above. (See Transaction Fields Available for Custom Reports and Customer Fields Available for Custom Reports below for field definitions.)
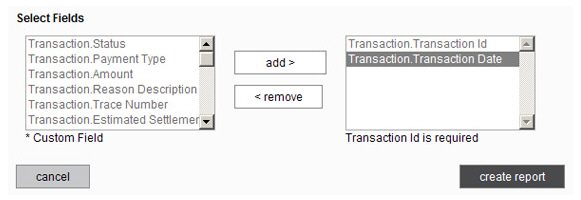
Highlight
a field you want to include in the report in the left box.
NOTE: To select multiple fields at
once, Shift
+ click to select sequential
fields, or Ctrl
+ click to select multiple
individual fields.
Click the “add” button to move the fields to the right box.
Repeat
steps a and b to add additional fields to the report.
NOTE: If you want to remove a field
from the report, highlight it in the right box, and click the
“remove” button to move it back to the left box.
Click the “create report” button to save the new custom report. Or click the “cancel” button to discard it.
If there are any errors, they will be noted in red on the screen. Correct them and click the “create report” button again. Otherwise you will see a pop-up window confirming that the new report has been created.
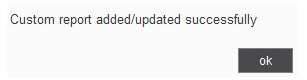
Click the “ok” button to close the pop-up.
The report is displayed based on the settings you entered. (See Viewing Custom Reports for a detailed explanation of the functions available from this screen.)
Click the “back to report summary” link at the bottom-right of the screen to return to the Reports dashboard, and the new report you just created will be the last entry in the custom reports table.
You can now:
View the report at any time by clicking its Report name. (See Viewing Custom Reports below.)
Edit the report. (See Editing Custom Reports below.)
Export the report. (See Exporting Custom Reports below.)
Subscribe to the report. (See Subscribing to Custom Reports below.)
Delete the report (See Deleting Custom Reports below.)