![]()
![]()
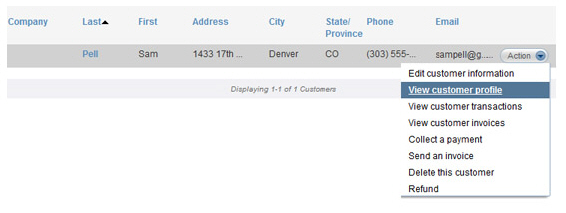
To view a Customer Record, either locate it in the table or search for it. (See Searching for a Customer above.) Then, select “View customer profile” from the Action button menu, or click the linked Last name.
The Customer Details screen will open as shown below:
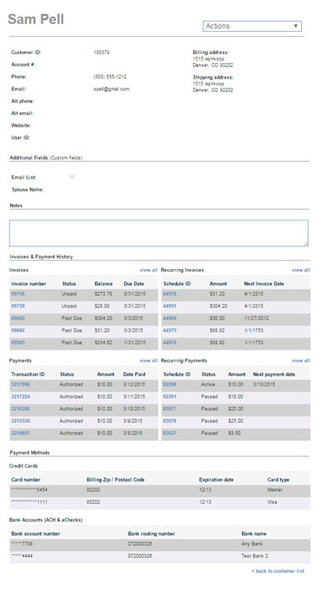
The top portion of the screen is a quick view of the information stored in the Customer Record, including the Customer ID, your Account # for the customer, contact information, billing and shipping address.,and User ID for Customer Portal. Click the “Reset Password” link next to the Customer User ID to reset the customer’s Customer Portal password.
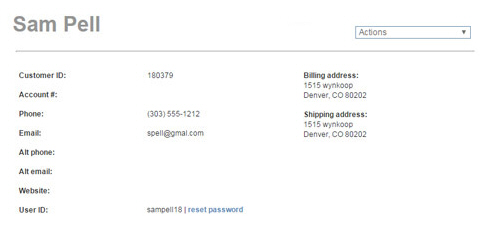
NOTE: The Customer’s name appears at the
top of the screen. If the customer is a representative of a company, the
company name will appear below the customer contact name. (In the above
example, the customer is a consumer so there is no company name.)
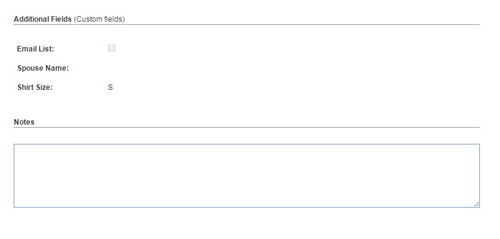
Custom fields you have created for the Customer Record, appear in the Additional Fields (Custom fields) section, and Notes you have saved with the customer. are shown in the Notes section.
The Invoices & Payments portion of the screen contains a snapshot of the customer’s recent activity.
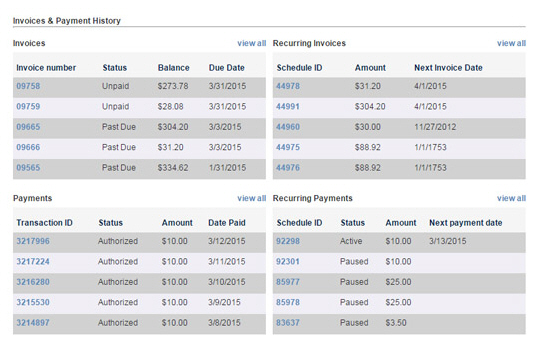
Invoices: This section displays this customer’s 5 most recent invoices, sorted by Due Date. (The invoice with the most distant Due Date is listed first.) The Balance amount in this chart is dynamically updated to reflect Early Payment Incentives and Late Payment Penalty Fees currently applied to the invoice. You can click a linked Invoice number to view the invoice. You can click the “view all” link at the top of the table to go to the manage invoices screen filtered to display only this customer’s invoices.
Recurring Invoices: This section displays this customer’s 5 most recent invoice schedules, sorted by Next Invoice Date. (The schedule with the most distant Next Invoice Date is listed first.) You can click a linked Schedule ID to view the invoice schedule. You can click the “view all” link at the top of the table to go to the manage recurring invoices screen filtered to display only this customer’s invoice schedules.
Payments: This section displays this customer’s 5 most recent payments, sorted by Payment Date. (The transaction with the most recent Payment Date is listed first.) You can click a linked Transaction ID to view the payment record. You can click the “view all” link at the top of the table to go to the manage payments screen filtered to display only this customer’s payments.
Recurring Payments: This section displays this customer’s 5 most recent payment schedules, sorted by Next Payment Date. (The schedule with the most distant Next Payment Date is listed first.) You can click a linked Schedule ID to view the payment schedule. You can click the “view all” link at the top of the table to go to the manage recurring payments screen filtered to display only this customer’s payment schedules.
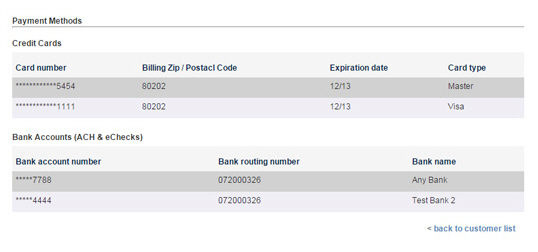
The bottom Payment Methods portion of the screen displays the credit card and bank accounts saved with the Customer Record.
Credit
Cards: This section displays all of the credit card accounts
attached to the Customer Record. It displays the truncated Card
number, the Billing Zip/Postal
Code attached to the card, the card Expiration
date, and the Card type.
NOTE: If your account is not configured
to accept credit card payments you will not see this section.
NOTE: You must edit the Customer Record to make changes to the saved
credit cards (such as updating the expiration date or changing the
default credit card account.)
Bank
Accounts (ACH & eChecks): This section displays all of
the bank accounts attached to the Customer Record. It displays the
truncated Bank account number,
the Bank routing number and
the Bank Name.
NOTE: If your account is not configured
to accept ACH/eCheck payments you will not see this section.
NOTE: You must edit the Customer Record to make changes to the saved
bank accounts (such as updating the routing number or changing the
default bank account.)
You can also take the following actions from the Customer Details page using the Actions drop-down menu located at the top-right of the screen.
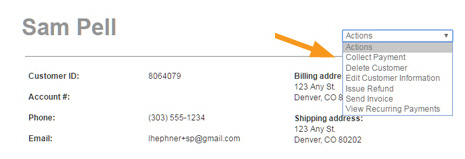
Select “Collect Payment” to launch the collect new payment screen with this customer’s information already loaded into the form.
Select “Delete
Customer” to completely remove the Customer Record from your ReceivablesPro system.
Confirm the delete in the pop-up window. When the delete is complete
you will be returned to the Customers table,
and the deleted customer will no longer be in the table, or otherwise
accessible in the system.
NOTE: If there are any unsettled transactions,
active recurring payment schedules, active invoices or active invoices
schedules you will not be able to delete the Customer Record, and
will see an error to this effect.
Select “Edit Customer Information” to open the Edit Customer Details screen from which you can edit the customer information and view and edit bank accounts and credit cards. (See Editing Customer Information and Managing Customer Payment Accounts.)
Select “Issue
Refund” to launch the collect payment screen with this customer’s
information already loaded into the form and the “Credit Card Credit”
payment type pre-selected. See Entering One-time Standalone Credits in Chapter
4 for detailed instructions on how to use this function.
NOTE: This function can only be used
to issue a stand-alone credit card credit. It cannot be used to locate
and select an existing transaction to refund in full (see Refunding Payments in Chapter 4 for instructions on how to fully refund
a settled payment.). It CANNOT be used for eCheck/ACH refunds.
WARNING: This function is designed to
enable you to offer a partial refund for a settled credit card transaction
you processed via the ReceivablesPro system.
Issuing a partial refund for an ACH transaction, a cash payment, or
anything other than a previously settled credit card transaction is
strictly prohibited. Doing so may result in your credit card processing
merchant account being suspended, assigned a longer settlement period,
or terminated.
Select “Send Invoice” to go to the send new invoice screen with this customer’s information already loaded into the form.
Select “View
Recurring Payments” to go to the manage recurring payments screen
with the table filtered to display all the “Active” schedules for
this customer.
NOTE: You can also view the most recently
added 5 schedules (of any status) for the customer by scrolling to
the “Invoices & Payments” section of the view customer screen.
Click the
“reset password” link to email your customer a new Customer Portal password.
NOTE: The password reset email will be
sent to the address shown in the Email field. If your customer claims not to
have received this email, double check that you have the email address
entered correctly. If you have the correct email address, ask your
customer to check SPAM and junk-mail folders for the password reset
email.
NOTE: If your customer has not yet enrolled for a Customer Portal account,
the User ID field will be blank and you will not
see the “reset password” link.
Click the “back to customer list” link, located at the bottom-right of the screen, to return to the Customers table.