![]()
![]()
Load a customer by completing the steps in either Enter a New Customer While Sending an Invoice or Load an Existing Customer for Sending an Invoice.
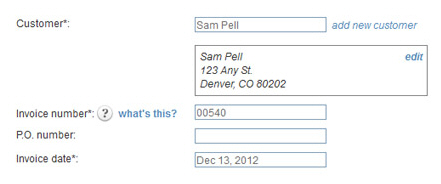
In the Invoice number field, leave the auto-generated invoice number, or enter your own invoice number.
If you have enabled auto-invoice numbering, leave this field as is to use the next Invoice number.
If you have enabled auto-invoice numbering, but want to override the auto-number, clear the Invoice number field and enter any alpha-numeric invoice number you choose.
If you have not enabled auto-invoice numbering the Invoice number field will be blank. You are required to enter an invoice number.
If your customer has a P.O. number, enter it in the P.O. number field. (Optional)
The Invoice
date field defaults to the current date. Leave this default
setting as is.
NOTE: See Scheduling One-time Invoices for a Future Date
in Chapter 5 for instructions
on how to enter a one-time invoice for a future date.
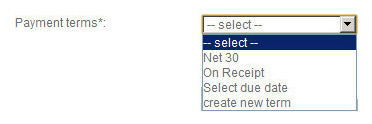
Select the Payment terms for this invoice. Do one of the following:
Select existing Payment terms by clicking the down arrow on the Payment terms drop-down box, and clicking on the terms you want to apply, as shown below:
The
Due Date will
be displayed to the right of the Payment
terms drop-down box, based on the selection you
made.
In this example, the current date is December 13, 2012, and
with Payment terms of
Net 30, the Due Date is calculated as January 12, 2013. (The
calculation begins the day AFTER the invoice is sent.)
Select “create new term” to create and use a new Payment term. See Entering Payment Terms above for how to enter new payment terms.
Select an exact due date.
Click the “Select due date” item in the Payment terms drop-down box list.
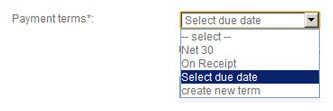
A new field containing the current date will appear next to the Payment terms drop-down box. Click the field to open a calendar from which you can select the due date. (Or just type the date in the field.)
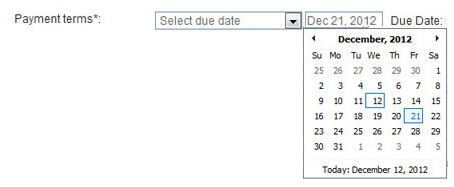
The
field to the right of the Payment
terms drop-down box will display the date you
selected, and the Due Date
field will also reflect that date, as shown below.
NOTE: You can change this date
by clicking in the field and selecting or entering another
date, and the Due
Date field will update
accordingly.
Configure Early
Payment Incentive.
NOTE: For detailed information on Early
Payment Incentives see About Invoice Incentives and Penalties in
Chapter 5.

The “No” radio button is selected by default. Leave this as is if you do not want to offer an incentive deduction to customers who pay invoices early.
To offer an incentive deduction, select the “Yes” radio button to open the incentive configuration fields.

Select the type of deduction you would like to offer from the drop-down box. “Percent” is the default. You can change this to “Flat Amount” by selecting that option from the box.
Enter the exact deduction you would like to offer in the Apply a field.
For a Percentage enter the deduction you want to provide off the invoice total. For example to provide a two and a half percent deduction, enter 2.5 (do not enter.025).
For
a Flat Amount enter a dollar value (without the $-- i.e.
enter 5.00 not $5.00).
NOTE: The incentive deduction
is entered as a positive number when it is configured,
but appears as a negative number (discount) on the actual
invoice.
In
the days before field,
enter the number of days in advance the invoice must be paid
in order to earn the discount.
In the example below we are offering a 10% deduction if the
invoice is paid more than 15 days prior to the due date.

Configure
Late Payment Fee.
NOTE: For detailed information on Late
Payment Penalty Fees see About Invoice Incentives and Penalties in
Chapter 5.

The “No” radio button is selected by default. Leave this as is if you do not want charge an additional fee for invoices that remain unpaid after the due date.
To charge a penalty fee, select the “Yes” radio button to open the penalty fee configuration fields.

Select the type of fee you would like to charge from the drop-down box. “Percent” is the default. You can change this to “Flat Amount” by selecting that option from the box.
Enter the exact penalty you want to charge in the Apply a field.
For a Percentage enter the penalty fee you want to charge over the invoice total. For example to charge a two and a half percent penalty fee, enter 2.5 (do not enter.025).
For a Flat Amount enter a dollar value (without the $-- i.e. enter 5.00 not $5.00).
In
the days after field,
enter the number of days after the invoice Due
Date to begin charging the late fee. (For example,
if the invoice is Due on January 1, and you enter 10 days,
the late fee will appear on January 11.)
In the example below we are charging a 10% late fee if the
invoice remains unpaid 15 or more days after the due date.

As this invoice is not part of a schedule, leave the invoice type drop-down box set to “One-time invoice.”
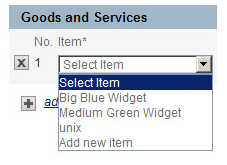
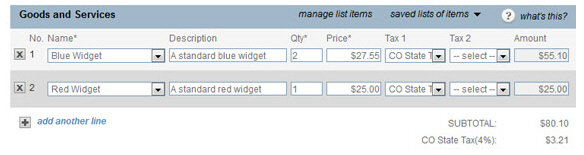
Enter the Line Items that comprise the invoice in the Goods and Services section, shown below:

Click the “Select Item” drop-down box arrow, as shown, and select one of the items in the list, or click the “Add new item” link to add a new item.
When you select “Add new item” from the drop-down box, the Add Goods & Services pop-up screen opens, as shown below:
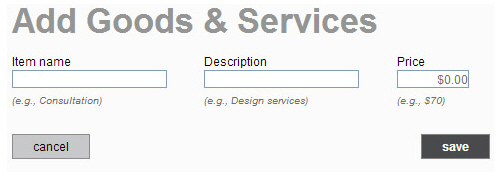
Enter a name for the item in the Item name field. (This name will appear in the drop-down box list and be included on the invoice.)
Enter a short description of the item in the Description field. This description will also appear on invoices.
Enter the unit price of the item in the Price field.
Click the “save and select” button to save the item and enter it as a Line Item in the invoice, or click the “cancel” button to discard it.
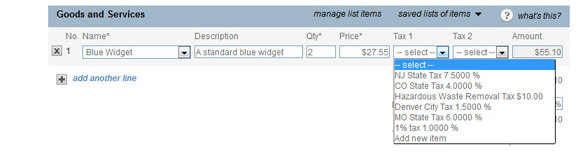
The Description and Price fields for the selected item will be auto-populated.
The Qty field will automatically be set to “1.” Change this value to the appropriate number for the invoice, if required.
In the Tax 1 drop-down box, select
a Tax that will be applied to this Line Item, as shown below.
(See Entering
Tax Rates above for how to enter and edit tax
rates). If you do not make a selection, then no tax will be applied
to this Line Item.
NOTE: The tax amount will be calculated
based on the Amount less any discount.
For example, if the tax rate is 10%, the Discount is 10%, and the
Amount is $100 the taxable amount for the line item will be $9.00--
(100 - 10) * 0.10 = 9.
|
You can also enter a new tax rate by selecting “add new item” from the Tax 1 (or Tax 2) drop-down box. This will open a pop-up window from which you can enter the Tax Name and the Rate. The new rate will be applied to the Line Item in the selected Tax category, will be saved, and will be included in the Tax drop-down boxes going forward. It can also be edited and deleted from the Settings--> Configuration--> Terms & taxes screen. |
In the Tax 2 drop-down box, select
a second Tax that will be applied to the Line Item, if applicable.
NOTE: The tax will be calculated
based on the total cost of the Line Item only, not on the cost
of the Line Item plus Tax 1. As you select taxes a new line for
the tax will be included under the SUBTOTAL line in the invoice.
The Amount field for the Line Item will reflect the total amount for the items alone, not including the taxes. i.e. Price x Qty = Amount.
Enter additional Line Items by clicking the “add another line” link to create a new row and then repeating steps a-f.
Delete Line Items by clicking the “x” to the far left of the line item.
The SUBTOTAL will be a sum of all the Line Item amounts. Taxes will be listed individually below the subtotal, as shown below:
In
the DISCOUNT field, enter
the percentage discount you want to provide off the invoice total.
You can enter any number between 0.01 and 99.99. For example to provide
a 2 and a half percent discount, enter 2.5 (do not enter.025).
The default discount is 0%. If you enter a discount, an additional
line will be added to the invoice, between the SUBTOTAL and
the taxes, for the discount, as shown below.
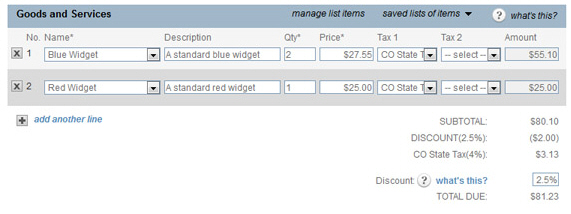
The TOTAL DUE field is calculated based on the total of all Line Items and taxes less any discount. (SUBTOTAL + TAXES - DISCOUNT)
The Note for customer field, shown below, is a text area in which you can type any note to your customer you like. There is a 2000 character limit for this field.

If you entered a system Note in the Settings --> Configuration--> Preferences section, that text will appear in the Note for customer field here. You can make changes to this field for any individual Invoice without changing the system-wide setting. If you want to change the system-wide default, click the “Set default” link to enter new default note text.
Click the “send
invoice” button to activate the invoice and launch the send configuration
screen. Or click the “cancel” button to discard it.
NOTE: If there are any errors in the
invoice, you will see the error(s) displayed at the top of the screen.
You can then make corrections and send the invoice, or discard it.
The Select invoice send options window opens.
The top portion of the screen contains send configuration settings.
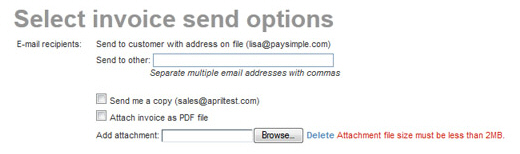
The
email is always sent to your customer’s default email address,
which is displayed.
NOTE: If there is not currently an
email address attached to the Customer Record you will be prompted
to enter one after clicking the “send invoice” button.
You can enter any email address in the Send to other field, or enter multiple email addresses separated by commas.
Checking
the Send me a copy box
will CC the email to your company’s email address which is displayed
in parenthesis.
NOTE: You can configure the system
to check this box by default and CC all invoices to the email
address you specify. To do this, go to the Settings-->
Configuration--> Email preferences and templates screen, and in the INVOICES section
select the “Yes, cc me on all invoices” radio button and enter
the email address to which you want the invoices sent.
Checking
the Attach invoice as a PDF file box
will instruct the system to attach a.pdf version of the invoice
to the email sent to your customer. This will enable the customer
to view and save the invoice directly from the email, even if
they are not connected to the Internet.
NOTE: The “click here” link in the
invoice email opens an online view of the invoice from which the
same.pdf version of the invoice that is attached to the email
can be saved or opened.
You
can attach any file to the invoice as long as it is under 2MB.
(Potentially dangerous file types such as.exe files will be rejected.)
Click the Browse button
next to the Add attachment field,
then select the file you want to attach from your computer. The
file path will be displayed in the field. (Click the “Delete”
link to clear the Add attachment field
and remove the file from the invoice.)
NOTE: The file will only be attached
the first time the invoice is sent—it is not saved by the system
and will not be automatically resent if the invoice is resent
(either manually or via the overdue invoice reminder function).
However, you can attach the file again each time you resend the
invoice.
The bottom portion of the screen contains a preview of the invoice Subject and Message, and is view only. Changes can’t be made from this screen. It displays the text message that will be sent with the invoice. NOTE: When your customer receives the invoice email it will contain a condensed version of the invoice underneath this message and a “PAY INVOICE NOW” button that your customer can click to log-into your Customer Portal and pay the invoice online.
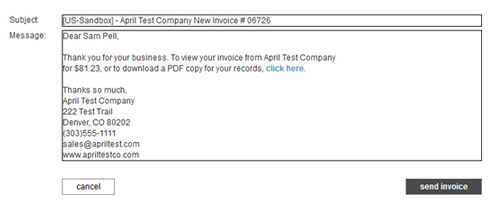
NOTE: If you would like to change the subject and/or text portion of
the new invoice email template (the condensed version of the invoice
isn’t editable), it can be done from the Settings--> Configuration-->
Email Preferences and Templates screen.
Scroll down to the INVOICES section, and click the “Edit” link for
the “New invoice email” template. (See Email Preferences and Templates in Chapter 8 for detailed instructions.)
Click the “send invoice” button to activate and send the invoice. Or, click “Cancel” to return to the send new invoice screen.

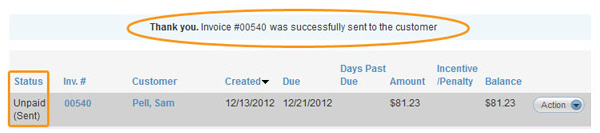
The
system will then display the manage
invoices screen, with a success message at the top, and
the invoice you just created at the top of the Invoices
table with a status of “Unpaid (Sent)” as shown below.
NOTE: As this invoice was configured
with an early payment incentive, which based on the invoice Due Date is currently active, the incentive amount
is displayed in the Incentive/Penalty field and the invoice Balance is
adjusted for the incentive. If the invoice remains unpaid once the
incentive period ends, the value will be removed from the field. If
the invoice remains unpaid after the penalty date trigger the penalty
value will be displayed in the Incentive/Penalty field and the Balance will
include the penalty amount. For detailed information on Early Payment
Incentives and Late Payment Penalties see About Invoice Incentives and Penalties in Chapter
5.