![]()
![]()
A Customer Record is comprised of contact information and payment account information, however only contact information is required. If you create a Customer Record that does not contain payment account information, you will be prompted to enter a payment account when processing a payment or entering a schedule.
|
Custom fields attached to the Customer Record are not supported in the Mobile App. However, if you have default values programmed for Customer Custom Fields, they will be saved with records entered from the Mobile App. and will be visible in the web-based UI. Additionally, once a new Customer Record is added via the Mobile App, you can edit it, including adding values to any custom fields, from the web-based UI. (See Custom Fields in Chapter 8 for more information about custom fields.) |
The process described in this section for entering a new customer via the Mobile App. covers entering contact information. For instructions on entering payment account information see Customer Payment Accounts and Adding Customers while Entering Payments and Schedules.
Follow the steps below to add a new Customer Record via the Mobile App.
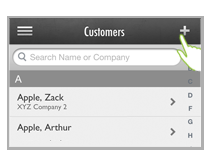
From the Customers screen, tap the + icon in the top right of the screen header to open the add customer screen.
The
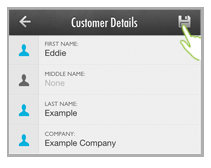
Customer Details screen opens
with a blank record. Tap a field to enter customer information.
NOTE: After accessing the initial field,
tap next field you want to complete (scrolling as necessary).
NOTE: Required fields have a red bar to the left of the field. As you
enter required information, the field icon turns blue, and the red
bar is removed. For example in the screen capture below, the required
First Name field has been completed, and the required
Last Name field is still blank.
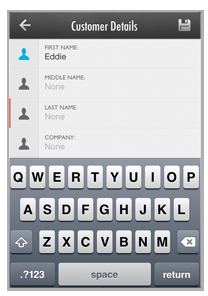
Enter the Customer’s First, Middle and Last name. (First and Last required)
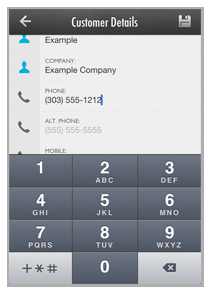
Enter a Company name. (optional)
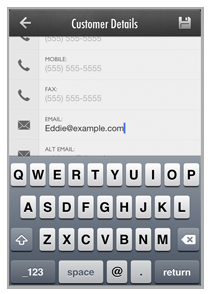
Enter a Phone number, Alt phone
number, Mobile and/or
Fax number. (optional)
NOTE: Just enter the digits for the phone
number, the App will correctly format it for you.
Enter an Email address and/or Alt
email address. (optional)
NOTE: If you do not enter an email address
the payment receipt cannot be emailed to your customer, and you must
provide it in some other way in order to remain in compliance with
credit card and ACH processing rules.
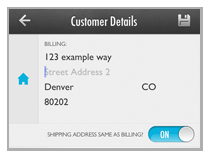
Enter the customer’s Billing address. (required)
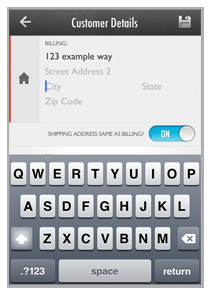
Enter Street Address 1 and Street Address 2 (1 is required, 2 is optional.)
Enter City.
Select
the customer’s State or
Province from the scroll wheel. (required)
NOTE: As with the web-based version,
the Mobile App supports U.S. and Canadian addresses only. US States
are listed first, then Canadian provinces, then US Territories
and Military States.

Enter the customer’s Postal Code. (required)
The default setting is to set the Shipping address equal to the Billing address. Leave the Shipping Same as Billing? toggle “ON” to use the default, as shown below.
To enter
a different Shipping address,
tap the Shipping Same as Billing? toggle
to change it to “OFF” and open the Shipping address fields.
NOTE: Tap it again to return to “ON.”
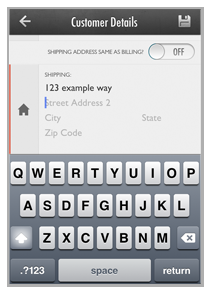
Enter
Shipping Street Address 1,
Street Address 2 (optional),
City, State,
and Zip Code.
NOTE: Once the shipping toggle is
turned “OFF” shipping fields are marked as required.
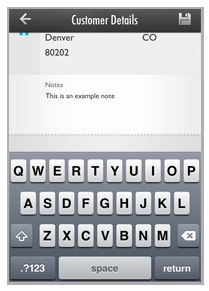
Tap the Notes box to enter a note for the Customer Record.
Review the entries, and tap any field to make a correction.
Tap the Save button at the top-right of
the screen to save the new Customer Record.
NOTE: If there are any errors, you will
see an on-screen message in a red bar at the very bottom of the page.
Correct the errors and tap the Save icon again.
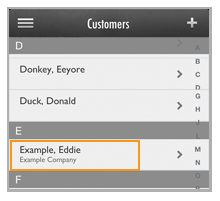
You are returned to the top of the Customers screen. Scroll to locate the newly added Customer Record, or search for it.
At this point, you can leave the Customer Record as is or you can add payment accounts. (See Customer Payment Accounts for instructions.)
Customer Records created via the Mobile App are immediately available in the web-based UI for editing and payment processing, and Customer Records created via the web-based UI are immediately available in the Mobile App.
