![]()
![]()
The Invoice Payment
Report report contains a row for each system payment made
against a system invoice with a payment date that falls within the range
you select in the Dated within
field.
NOTE: Online invoice payments, and invoice
payments collected via the system (using the “collect payment” option
in the Invoice Action menu) are included in this report. “Mark
as Paid” payments are not included in this report. For a report that contains
“Mark as Paid” information, export the Invoices table from the manage invoices screen. (See Exporting Invoice History in Chapter 5 for instructions.)
The default report view shows all invoice payments
made on the previous day. When you are done viewing the report,
click the “back to report summary” link at the bottom of the screen to
return to the Reports dashboard.
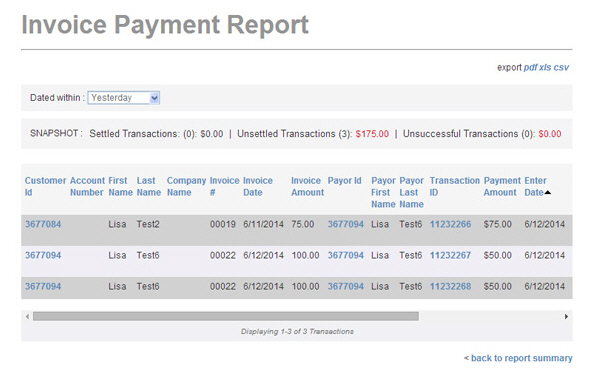
A SNAPSHOT of activity appears above the table. The SNAPSHOT covers only the filtered data in the table report. Thus, values in the snapshot will change as you change the date range filter for the report.
The SNAPSHOT provides a total number and dollar amount for the following payment statuses:
Settled Transactions-- Successful
payments with a status of “settled” for which you have received funds
in your bank account.
NOTE: Funds may not appear in your bank
account until several days after ReceivablesPro records
them as settled. This is a reporting issue related to your bank.
Unsettled
transactions-- Payments that have been successfully submitted for
processing, but have not yet settled. You have not yet received funds
in your bank account for these transactions. Transactions with a status
of “Authorized” and “Posted” are included in this sum.
NOTE: It is possible that your customers
will see the funds debited from their accounts for these transactions,
even though you have not yet received the funds.
Unsuccessful transactions-- Payments that were not successfully processed, were disputed by your customers, or payments that you voided. Transactions with a status of “Voided,” “Returned,” “Chargeback,” and “Failed” are included in this sum.
The transaction table displays 10 rows at a time, and lists the oldest transactions first. To see the newest transactions first, click the linked Transaction Id column header. If there are more than 10 transactions, there will be page numbers at the bottom of the table. Click the linked page numbers to navigate through the table results.
|
The
Invoice Payment Report contains
information about the Customer Record to which the invoice was
sent (Customer fields),
as well as the Customer Record associated with the invoice payment
(Payor fields).
If the Customer does not log in to pay the
invoice (pays as a guest), a new Customer Record will be created
when the invoice is paid. The invoice will be marked as paid in
your ReceivablesPro system,
but the payment will be attached to the new Customer Record and
the invoice itself will be attached to the original Customer Record.
The Payor fields
in the Invoice Payment Report provide
information for the new Customer Record created as a result of
the “guest” payment. |
|
The Invoice Payment Report is
the only place you will see fields labeled as “Payor.” |
Use the horizontal scroll bar to view all of the columns in the table. Definitions of all fields included in the report are provided below. You can click on any of the linked column headers to sort the table results based on that column. Column headers that are not linked can not be used for sorting.
Customer
ID-- Each customer in your ReceivablesPro system
is assigned a unique Customer ID.
This field indicates the Customer
ID for the customer to which the invoice was sent. You
can sort the report by Customer ID.
Click once to sort from high-to-low (newest/most recently added customers
to oldest customers), and click again to sort from low-to-high (oldest
customers to newest customers).
The Customer ID is linked
in this report. Clicking the linked Customer
ID opens the Customer Record in view mode. Click the back
button to return to the report when you’re done with the Customer
Record.
Account
Number-- The Account # for the Customer to which the invoice
was sent. If an Account # was
included for the customer when it was created, that number will be
displayed in this field. If no Account
# was assigned, the field will be blank. You can sort
the field alpha-numerically, with blank being the lowest. Click once
to sort from high-to-blank. Click again to sort from blank-to-high.
NOTE: Account
# is an optional field.
However, it is very useful when integrating ReceivablesPro with
your other systems. The Account
# field is included in this report,
so you can use it as a key when exporting data from ReceivablesPro and importing
it into another system.
First Name-- The first name for the customer to which the invoice was sent. The sort is alphabetical. Click once to sort from A-to-Z, click again to sort from Z-to-A.
Last Name-- The last name for the customer to which the invoice was sent. The sort is alphabetical. Click once to sort from A-to-Z, click again to sort from Z-to-A.
Company Name-- The company name for the customer to which the invoice was sent. The sort is alphabetical. Click once to sort from A-to-Z, click again to sort from Z-to-A.
Invoice #-- The system invoice number to which the payment is attached. If a multiple partial payments were made against an invoice, you can use this sort to group them together. The sort on this column is alphanumeric, with blanks appearing at the lowest end. Click once to sort to sort from Z-to-Blank. Click again to sort from Blank-to-Z.
Invoice Date-- The date the invoice was originally sent. Click once to sort from oldest-to-newest, and click again to sort from newest-to-oldest. The default table view is sorted newest-to-oldest.
Invoice Amount-- The base Amount due for the invoice, not including any incentives, penalties, or partial payments. Amounts are sorted numerically by dollar amount. Click once to sort from low-to-high, click again to sort from high-to-low.
Payor ID--
The unique Customer ID assigned
to the new Customer Record created when an invoice is paid as a “guest.”
You can sort the report by Payor
ID. Click once to sort from high-to-low (newest/most recently
added customers to oldest customers), and click again to sort from
low-to-high (oldest customers to newest customers).
The Payor ID is linked
in this report. Clicking the linked Payor
ID opens the Customer Record in view mode. Click the back
button to return to the report when you’re done with the Customer
Record.
NOTE: If your customer was logged in
to make the payment, the Payor
ID will be the same as the
Customer ID in the report. If a “guest” payment
was made, the Customer
ID will be the ID to which
the invoice was sent, and the Payor
ID will belong to the new
Customer Record created for the payment. Note that there is currently
no way to join duplicate Customer Records.
Payor First Name-- The first name for the customer who made the payment. The sort is alphabetical. Click once to sort from A-to-Z, click again to sort from Z-to-A.
Payor Last Name-- The last name for the customer who made the payment. The sort is alphabetical. Click once to sort from A-to-Z, click again to sort from Z-to-A.
Transaction
ID-- The Transaction ID is
a unique identifier that ReceivablesPro assigns
to each payment processed by the system. Transaction
IDs are assigned to all payments, including failed payments.
Click once to sort from high-to-low (newest-to-oldest), click again
to sort from low-to-high (oldest-to-newest).
The Transaction ID is linked
in this report. Clicking the linked
Transaction ID opens the Transaction
Details screen for the payment. Click the back button
to return to the report when you’re done with the Transaction
Details page.
Payment Amount -- The dollar amount of the payment. Payments are sorted numerically by dollar amount. Click once to sort from low-to-high, click again to sort from high-to-low.
Enter Date-- The date the transaction was processed. Transactions are sorted chronologically by enter date. Click once to sort from newest-to-oldest, and click again to sort from oldest-to-newest. The default table view is sorted oldest-to-newest.
Actual Settle Date-- For transactions with a status of “Settled” the date the transaction actually settled. For transactions with any other status, this field will be blank. Click once to sort from blank-to-oldest-to-newest, and click again to sort from newest-to-oldest-to-blank.
Status-- The transaction status--
for example “settled,” “authorized,” “posted” or “voided.” Transactions
are sorted alphabetically. Click once to sort from Z-to-A; click again
to sort from A-to-Z.
Note: See above
for definitions of each status type.
Transaction Type-- All Echeck (ACH) transactions in this report have a type of “ACH.” Card-not-present transactions (those entered online, or those you enter in the system for your customers) will a type of “MOTO.” If you collect payment for the invoice at the point of sale and swipe your customer’s credit card, the transaction will have a type of “SWIPE.” Transactions are sorted alphabetically. Click once to sort A-to-Z, click again to sort Z-to-A.
Payment Method-- For credit card transactions, this field will indicate whether a Visa, MasterCard, Discover, or American Express card was used. For ACH, this field will indicate the ACH Type (CCD--Business, PPD--Written, TEL--Telephone, WEB--Website). Transactions are sorted alphabetically. Click once to sort from Z-to-A, and click again to sort from A-to-Z.
Return Date-- The date and time
an ACH payment was reported as Returned. Click once to sort from newest-to-oldest,
and click again to sort from oldest-to-newest. The default table view
is sorted oldest-to-newest.
NOTE: The system scheduler updates transaction
statuses at the same time each night, thus all of the times displayed
in this column will be the same or within a few seconds each other.
You can change the date filter on the report, which is based on enter date, by selecting a new date range in the Dated within drop-down box. (See Filtering Standard Reports By Date below.)
Additionally, you can export the report in Excel .xlsx, .csv (comma delimited text), and Adobe Acrobat .pdf format. (See Exporting Standard Reports below.)
