![]()
![]()
You can easily process payments over the phone or in person for ReceivablesPro invoices. Watch the following one minute video tutorial to see how it’s done. Detailed step-by- step instructions are provided below.
Locate the invoice for which you want to collect payment in the Invoices table.
The easiest way to do this is to filter the table by Customer. (See Filter by Customer above for instructions.)
Click the Action button then click the “Collect payment” link, as shown below:

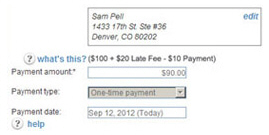
A collect new payment screen opens, with the customer loaded, the Invoice number field populated with the appropriate invoice number, and the Payment amount field populated with the total balance due for the invoice, as shown below:
If your customer
is making a partial payment, you can lower the Payment
amount to the amount of the installment being paid. Otherwise,
leave this field as is.
NOTE: You will be able to edit this field
even if you do not have partial invoice payments enabled for your
ReceivablesPro system.
If you enter a partial payment, after clicking “submit” you will see
an error message informing you that partial payments are not permitted
for your account. After acknowledging the error you will be returned
to the Collect
Payment screen where you
will need to enter the full amount of the invoice in the Payment amount
field to successfully process the payment. (Note that you’ll need
to do this from memory as it will no longer be displayed on screen.)
NOTE: If you enter a partial payment for an invoice on which an Early Payment Discount
is active you will remove the
discount opportunity.
The Payment type field will be filled with “One-time payment” and you will not be able to edit this value.
The Payment
date field defaults to the current date. Leave this as is to
process the payment immediately.
NOTE: You can select a future date for
the payment. See Scheduling One-Time Payments for a Future Date in
Chapter 4 for details on
how one-time payments for a future date are processed by the system.
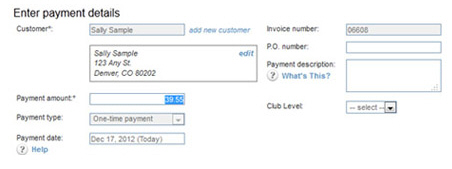
In
the Choose A Payment Method section,
select echeck (ACH) or Credit card, and then select the account to
use or enter a new one. (See Entering One-time Payments in Chapter 4
for instructions.)
NOTE: The default account for the Payment Method will be automatically selected.
Make any modifications necessary to Email receipt and failure notifications. (See Entering One-time Payments in Chapter 4 for how to do this.)
Click the “collect payment” button. (If there are any errors, you will be prompted to correct them at this point. After making required changes, click the “collect payment” button again.)
You are returned to the manage invoices screen with a success message at the top of the table and the status of the invoice changed to “Paid” or “Paid (partial)” in the Invoices table as shown below:

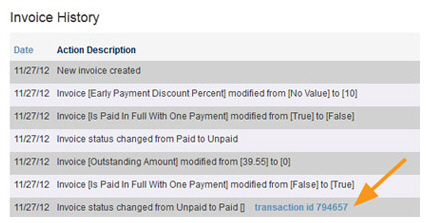
If you click the linked Inv. # to view the invoice, the Transaction ID for the payment will be noted in Invoice History. Click the linked Transaction ID to view Transaction Details.
|
PROCESSING INVOICE PAYMENTS DIRECTLY FROM
THE COLLECT NEW PAYMENT SCREEN ONE-TIME PAYMENTS RECURRING PAYMENTS
|