![]()
![]()
You can enter new items while creating invoices from the send new invoice screen, or from the List Item Management screen accessed from the configuration tab in the Settings center. This section provides instructions for entering items while creating an invoice. For instructions on how to enter and manage items from the List Item Management screen, see Invoice Items in Chapter 8.
To enter a new Item from the Invoices center, follow the steps below:
Go to the send new invoice tab in the Invoices center.
In the Goods and Services section, click the down arrow on the Select Item drop-down box.
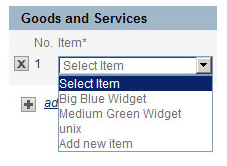
At the bottom of the list of items (if any), select “Add new item.”
The Add Goods & Services pop-up screen appears.

Enter an Item name, a brief Description,
and a unit Price for the item.
NOTE: Everything you enter will be displayed
to your customers on invoices. Additionally, the Item name will
be displayed in the Select item drop-down box.
NOTE: You can create items with a positive or negative price. For example,
to create an item that costs $10, enter “10.” To create an item that
credits $10, enter “-10.”
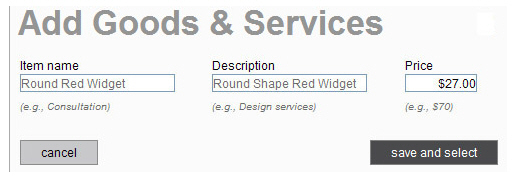
Click the “save
and select” button to save the new item and use it for a Line Item
in the active invoice. Or, click the “cancel” button to discard it.
NOTE: To complete the Line Item for use
in an actual invoice, you need to change the quantity in the Qty field
as required, and add Tax 1 and/or Tax 2 as applicable. (See Entering
One-time Invoices.)

Repeat steps 2-6 to add additional items to your saved items catalog.
|
Once saved,
you can edit items from the “manage list items” link in the Goods and Services header bar
(See Managing
Items) or from the
List Item Management screen (See Invoice Items in Chapter 8). |
