![]()
![]()
When entering a new one-time credit card payment, or new recurring credit card payment schedule, you will need to select the credit card that will be charged or enter a new card by keying it in or swiping it. ReceivablesPro securely stores credit card information with a Customer Record so that it can be easily accessed for future payments.
In the Choose a payment method section you can select any saved account to use with any new transaction, and you can also enter new credit cards right from the collect new payment screen. To do this, follow the steps below:
If there is a card (or cards) saved with the Customer Record, the screen will appear as shown below:
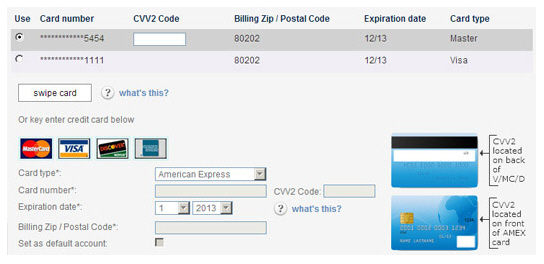
If there is only one credit card saved, it is designated as the “default” account, and its radio button will be automatically selected in the Use column. If there is more than one saved credit card, the “default” account’s radio button will be selected in the Use column. To use the selected credit card for the transaction, ask your customer for the card CVV2 code and enter it in the CVV2 Code field. (See About the CID Number below for more information.)
To use a different existing card, select its radio button in the Use column, ask your customer for the card CVV2 code and enter it in the CVV2 Code field.
|
You
cannot edit or delete credit cards from this screen, nor can
you set or change the default credit card. If you need to
delete a credit card, edit a credit card expiration date,
or change the default credit card, you can do it from the
Customer Record. You cannot edit credit card numbers in ReceivablesPro once
they are saved. If you need to change a credit card number,
delete the original card and save a new credit card using
the new number. |
If there is not a saved credit card, the screen will display new-card entry fields, as shown below:
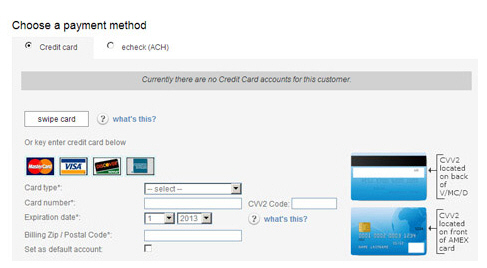
Select
the type of card (American Express, Visa, MasterCard, Discover)
from the Card type drop-down
box.
NOTE: Your account may not be configured
to accept all 4 card types.
Enter the credit card number (without any spaces or dashes) in the Card number field.
Ask your customer for the card CVV2 Code, and enter it in the field. (Optional) See About the CID Number below.
In the Expiration date fields, select the expiration month in the first drop-down box and the expiration year in the second drop-down box.
Enter
Billing Zip/Postal Code for
the card if the field is not auto-filled for you.
NOTE: The Billing
Zip/Postal Code field
is used for AVS address validation. The field will auto-fill with
the Zip/Postal
Code saved for the Customer
Record. Ask your customer to confirm that this value is correct
when entering a new credit card. If the field is blank, ask your
customer to provide the billing zip code associated with the credit
card.
Check
the Set as default account
box to set the account as the default.
NOTE: As this is the first saved
credit card it will automatically be set as the default whether
or not you check the box.
Whether or not the credit card is already saved
with the Customer Record, you can swipe the card to enter a new transaction.
If the swiped card is already saved with the Customer Record, the
system will not duplicate it, but it will update the card expiration
date if it has changed.
To swipe the card, click the swipe
card button to open the Credit
Card Swipe box. Swipe the card and confirm that the card
type, truncated card number, and expiration date are shown in the
box, confirm that the Billing Zip
/ Postal Code is correct (or enter a new one), then continue
with the rest of the transaction.
For detailed instructions on swiping cards for one-time transactions
see Swiping a Card for New One-time Payments.
As it is against processing rules to store credit card track data,
swiping is simply a data entry short-cut for scheduled payments. The
system extracts the credit card type, account number, and expiration
date and stores them, but not the track data, for later use generating
scheduled payments. All scheduled payments, regardless of how the
card information is input, are processed as MOTO transactions. For
detailed information see Swiping a Card for New Schedules.

