![]()
![]()
The following quick steps show you how to process a payment for an existing customer. For detailed information on processing payments, see Chapter 4: Payments.
Watch this 90 second video to see how it’s done. Then follow the step-by-step instructions below.
Navigate to the Payments--> Collect New Payment screen by clicking the “Collect Payment” Quick Link.
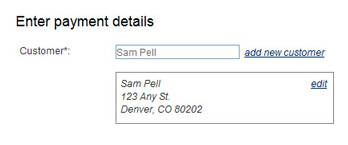
Enter any portion (at least 3 characters) of the Company Name, First Name or Last Name in the Customer field, as shown above.
A list of potential matches will appear below the Customer field.
Click the one you want to load.
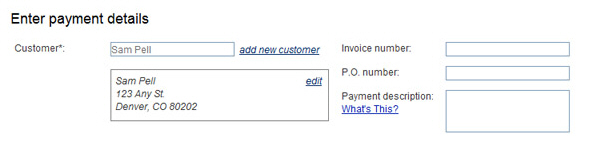
You should now see the customer you selected loaded into the new payment form, as shown below:
All
fields in the Enter payment details section
are optional. You can enter an Invoice
number, P.O. number,
and/or a brief Payment description
(250 character maximum).
NOTE: If you will be swiping a credit card for an in-person Retail
transaction, it is very important that you enter a Payment
description, as it will be used to meet the processing rule
that requires a description of goods and services be included on the
payment receipt.
Enter the amount you are collecting in the Payment amount field—Enter an amount in the format of 0.00, do not include the $, it will be added by the system.
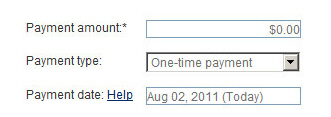
Leave the Payment type field with “One-time payment” selected.
The
Payment date field defaults
to the current date. Leave this field as is.
NOTE: See Scheduling One-Time Payments for a Future Date
in Chapter 4 for instructions
on entering one-time payments for a future date.
Select
Credit card or echeck (ACH) in the Choose
a Payment Method section.
NOTE: You will only see one option here
if your account is configured for only Credit Card or only Echeck
(ACH) processing, in which case you will not need to make a selection.
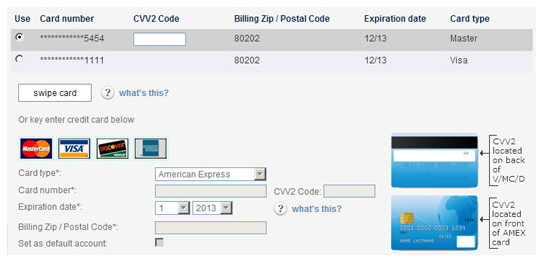
Select
the radio button for the credit card you want to charge, or
enter new card information in the section below the existing
credit card list.
NOTE: The default credit card
account will be automatically selected.
NOTE: You can also swipe a new credit card for the customer
as described above and
in Swiping a Card for New One-time Payments
in Chapter 4.
If you selected a saved card, or hand-entered the card number, ask your customer for the card’s CVV2 code, and enter it in the CVV2 Code field. For an existing card, use the CVV2 Code field in the table. For a new card, use the field in the new card section. (This is optional, but strongly recommended for security reasons. The CVV2 code is never stored by the system, and must be supplied by your customer for each transaction.)
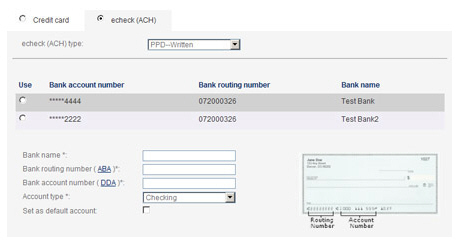
In the echeck (ACH) type field, select the type of ACH transaction for which you have obtained authorization. (See Appendix A: Authorizing Transactions for more information on ACH types.) The following Types are appropriate for one-time transactions:
PPD-- Written (You have a signed authorization form from your customer.)
TEL-- Telephone (Your customer authorized the transaction over the phone.)
WEB-- Website (Your customer authorized the transaction via a form on the Internet.)
CCD--
Company (A transaction between 2 companies where you have
an overriding agreement with the other company for ACH
transactions.)
NOTE: Many business checking
accounts are not enabled for ACH transactions. Before
entering a CCD transaction, make certain that your customer
affirms that the account is enabled for ACH. If it is
not, you may be assessed Return fees and/or Chargeback
fees.
Select the radio button for the bank
account you want to charge or enter a new bank account in
the section below the existing bank account list.
NOTE: The default bank account
will be automatically selected.
Review the receipt and failure notification settings, and make any required changes.
Click the “collect payment” button at the bottom right of the screen to submit the payment. Or click the “cancel” button to discard it.
If there are any errors with the transaction, or if it is not authorized, you will see the error displayed at the top of the screen. You can then make corrections and re-submit the payment, or discard it.
When the payment is authorized,
you will see the transactions table in the manage
payments screen, with a success message for the transaction, and
the transaction you just processed at the top of the list.
NOTE: If you swiped a credit card to process
the payment, you will see a pop-up box asking you to print a receipt for
your customer to sign if the payment is successful. Be sure to print this
receipt and collect the signature in order to properly authorize your
transaction. After the receipt prints, you will see the transactions table.
See Swiping a Card for New One-time Payments in Chapter
4 for details.