![]()
![]()
Your customers need to complete the steps below to make a payment via an online payment form without logging into a Customer Portal account:
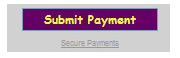
Click a pay now link or payment button (sample below) from a website or in an email to access the payment form.
The payment landing page appears, as shown below:
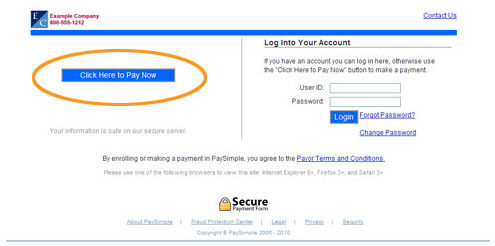
To make a payment without logging in, or if the customer doesn’t have an account, click the “Click Here to Pay Now” button.
The new payment form opens, as shown below:
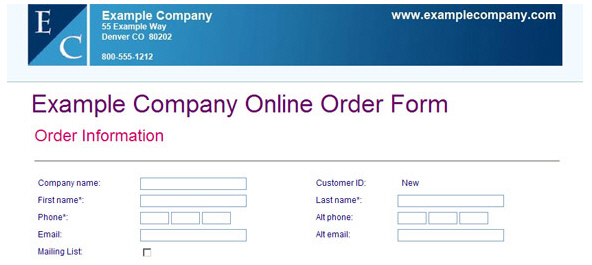
Complete
the Order Information fields.
Fields marked with an asterisk (*) are required.
NOTE: There may be additional fields
in the Order
Information section. Each
payment form can contain a unique set of custom fields in this section.
(See Add a Web Payment Page in Chapter 8 for details on how to add custom fields
to your payment forms.)
Enter the appropriate Payment Information, depending on the type of payment submitted via the payment form.
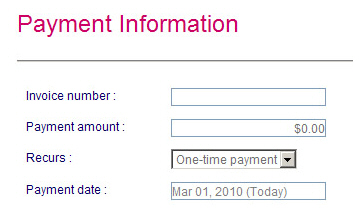
Enter
an Invoice number
if available. (Optional)
NOTE: Not all web payment forms
will include this field. It is a customizable setting on a
form-by-form basis.
NOTE: If a customer makes a payment on a Web Payment Page
without logging in, the Invoice
number field cannot
be used to attach the payment to an ReceivablesPro
system invoice.
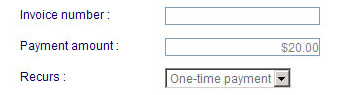
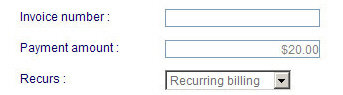
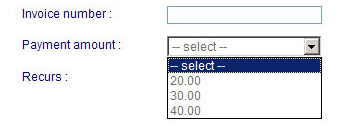
Enter, select, or review the amount to pay in the Payment amount field.
If the Payment amount field is blank, enter the amount to pay.
If the Payment amount field contains a value and is greyed out, it cannot be changed. The amount shown is the amount customers will be charged if they submit the form.
Select one of the amounts to pay from the Payment amount drop-down box. One of the amounts in the drop-down box must be selected, a custom amount cannot be entered.
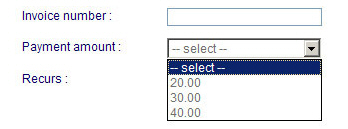
NOTE: Only one of the above
3 options will appear on the payment form.
The Recurs drop-down box will have “One-time payment” automatically selected, and there may be other options in the drop-down box. Leave this drop-down box set to “One-time payment.”
The Payment date will be auto-filled with the current date, and cannot be edited. All one-time payments must be processed on the day they are entered.
Recurring Bill Payment Schedule
Enter
an Invoice number
if available. (Optional)
NOTE: Not all web payment forms
will include this field. It is a customizable setting on a
form-by-form basis.
NOTE: If your customer enters a schedule on a Web Payment Page
without logging in, the Invoice number field cannot be used
to attach the schedule to a system invoice.
Enter, select, or review the amount of each payment to be made in the Payment amount field.
If the Payment amount field is blank, enter the amount to pay.
If the Payment amount field contains a value and is greyed out, the amount cannot be changed. The amount shown is the amount that will be charged for each payment in the schedule.
Select one of the amounts to pay from the Payment amount drop-down box. One of the amounts in the drop-down box must be selected, a custom amount cannot be entered.
NOTE: Only one of the above
3 options will appear on the payment form.
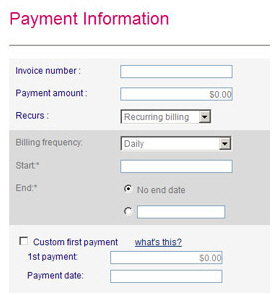
In the Recurs drop-down box, select “Recurring billing.”
In the Billing frequency drop-down box select how often to be billed (Daily, Weekly, Every other week, First of month, Specific day of month, Last of month, Quarterly, Semi-annually, Annually).
If “Weekly” or “Every other week” is selected, an additional drop-down box appears in which to select the day of the week to bill.
If “Specific day of month” is selected an additional drop-down box appears in which to select the exact day of the month to billed.
If “Quarterly” “Semi annually” or “Annually” is selected the exact payment dates will be calculated based on the schedule start date.
Place the cursor in the Schedule start date field, and select the start date from the pop-up calendar.
In the End field, either leave the “No end date” radio button selected to run the schedule indefinitely; or select the radio button next to the blank field, place the cursor in the field, and select the exact end date for the schedule from the pop-up calendar.
Optionally, enter a Custom first payment. A
custom first payment is an amount paid prior to the Start date of the schedule.
It can be the same or different from the schedule amount.
For example, you might use the custom first payment for a
$100 set-up fee, and schedule payments of $20 a month for
ongoing service fees.
To enter a Custom first payment:
Check the Custom first payment checkbox.
Enter the amount of the custom first payment in the 1st payment field.
Place
the cursor in the Payment
date field, and select the date for the custom
first payment from the pop-up calendar.
NOTE: The custom first payment
date must be at least one day be before the Schedule start
date.
Enter
an Invoice number
if available. (Optional)
NOTE: Not all web payment forms
will include this field. It is a customizable setting on a
form-by-form basis.
Leave
the Payment amount
field blank.
NOTE: Don’t worry if there is
an amount in the field, or a drop-down box in which to select
an amount. The field will be cleared once “Payment plan” is
selected in the next step.
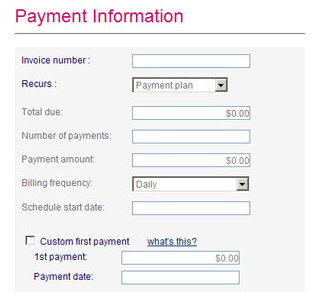
In the Recurs drop-down box, select “Payment plan.”
A new set of fields will appear in which to enter the payment plan information.
Enter the total amount to pay via the plan in the Total due field.
The Payment amount field will be auto-filled with the payment amount. (The system will divide the Total due by the Number of payments, and round-up to the nearest cent to determine the Payment amount.)
In the Billing frequency drop-down box select how often to bill. (Daily, Weekly, Every other week, First of month, Specific day of month, Last of month, Quarterly, Semi-annually, Annually).
If “Weekly” or “Every other week” is selected, an additional drop-down box appears in which to select the day of the week to bill.
If “Specific day of month” is selected an additional drop-down box appears in which to select the exact day of the month to billed.
If “Quarterly” “Semi annually” or “Annually” is selected the exact payment dates will be calculated based on the Schedule start date.
Place the cursor in the Schedule Start date field, and select the start date from the pop-up calendar.
Optionally enter a Custom first payment. A custom first payment in a Payment Plan is used as a down payment against the total due prior to the scheduled payments. For example, if you owe a total of $500, you might make a custom first payment of $100, and then 8 additional scheduled payments of $50 each. To enter a Custom first payment:
Check the Custom first payment checkbox.
Enter
the amount of the custom first payment in the 1st
payment field.
NOTE: When this is done,
the Payment amount field adjusts to take the custom first
payment into account. The Payment amount is calculated
as follows:
(Total Due - Custom
first payment) / Number of payments = Payment amount
Place
the cursor in the Payment
date field, and select the date for the custom
first payment from the pop-up calendar.
NOTE: The custom first payment
date must be at least one day before the Schedule start
date.
In the CHOOSE
PAYMENT TYPE section, select the radio button for the payment
method to use—Credit Card or
an Echeck (ACH) transfer
from a bank account.
NOTE: If your payment form has been configured
to accept only one type of payment, then a selection need not be made.
Fields for entering a new account for that payment type will show
by default.
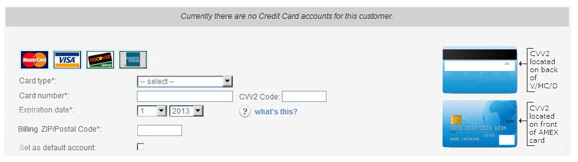
Select the Card type from the drop-down box.
Enter the Card number.
Enter the CVV2 Code. (This is the four digit number on the front of American Express cards, or the three digit number on the back of Visa, MasterCard and Discover cards.)
Enter the card’s Expiration date using the first drop-down box for the month and the second drop-down box for the year.
Enter the Billing Zip/Postal Code associated with the card.
Leave
the Set as default account
box unchecked.
NOTE: As a new Customer Record
is created whenever a payment is made while a customer is
not logged in, the credit card will automatically be set as
the default account, regardless of whether the box is checked,
since it will be the only one associated with the new Customer
Record.
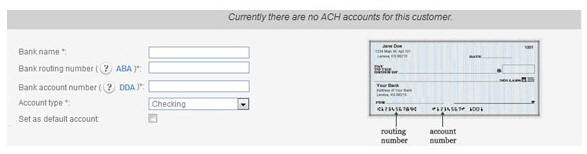
Enter the Bank name.
Enter the 9-digit Bank routing number.
Enter the Bank account number.
Select “Checking” or “Savings” as the Account type.
Leave
the Set as default account
box unchecked.
NOTE: As a new Customer Record
is created whenever a payment is made while a customer is
not logged in, the bank account will automatically be set
as the default account, regardless of whether the box is checked,
since it will be the only one associated with the new Customer
Record.
Enter
Billing information in
the appropriate fields. Fields marked with an asterisk (*) are required.
NOTE: If paying via credit card, be certain
to enter the exact billing address attached to the credit card account,
or the system may not properly authorize the payment.
NOTE: The Country field defaults to “USA” which places U.S.
state and territory codes in the
State/Province field. For
Canadian addresses, select “Canada” in the Country field and you will then be able to select
a Province code from the State/Province field. When entering Canadian Postal
Codes do not use any dashes or spaces.
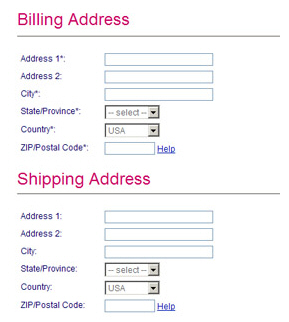
If the Shipping Address section is visible (it can be included or omitted on a form-by-form basis), complete these fields.
In the Create
Account section, customers can enroll in Customer Portal.
NOTE: Creating an account also enables
customers to log-in to pay via web payment forms, even if they never
access the Customer Portal application itself.
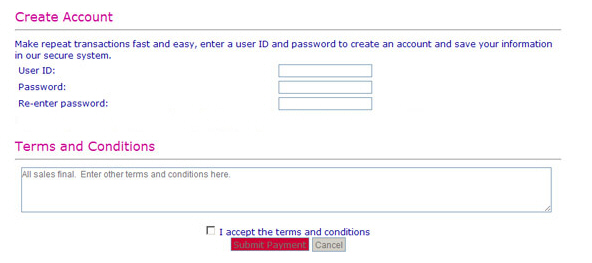
They can leave this section blank if they do not want to create an
account. To enroll, follow the steps below:
Enter a User ID in the field. Once saved this User ID cannot be changed by the customer.
Enter a Password
in the field.
NOTE: Passwords must be at least
8 characters, contain at least one capital letter, one lowercase
letter and one number, and not contain the User ID.
Re-enter the password in the Re-enter Password field
.
Review the merchant Terms and Conditions and the Buyer Terms and Conditions, and check the “I accept the terms and conditions” box to indicate agreement.
Click the “Pay Now” button to submit the payment, or click the “Cancel” button to discard it.
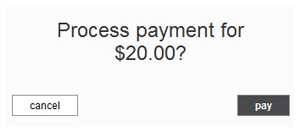
A pop-up box will appear asking you to confirm the payment amount. Click “pay” to process the payment, or click “cancel” to return to the payment form and enter a different amount.
If there is an error with the payment, it will be noted at the top of the page. Make any required corrections and submit the payment again. When the payment is successful, a printable thank you screen is displayed that contains a Confirmation number along with a summary of the transaction or schedule entered.
NOTE: The thank you page may contain social networking links inviting your customer to connect with you on Facebook, Twitter or Yelp while their experience with your company is fresh in their minds.
Customers also receive an email receipt for the processed payment. If a recurring bill payment schedule or a payment plan schedule was entered, the confirmation screen will include schedule details and the customer will receive an email confirming the schedule authorization and summarizing the details of the schedule.
