![]()
![]()
You can upload your company logo into ReceivablesPro, and it will appear on all invoices you create and send via the system. Your logo will also appear on the login page your customers use to pay invoices online, and on the login page for your Customer Portal. (See Appendix E: Customer Portal.) This is not a required step, but uploading a logo will help reinforce your brand on invoices.
Follow these steps to upload a logo:
Open the Pick Your Preferences screen by clicking "invoice preferences" in the INVOICE CONFIGURATION section of the Settings-->Configuration screen.
In the Upload your company logo section
of the Pick Your Preferences screen, click the
“Browse” button to locate your logo on your hard drive and select
it.
NOTE: In the Google Chrome browser, the
button will say “Choose File” and will be to the left of the field.
NOTE: The file must be no more 150KB
in size, and in JPG, GIF or PNG format. The system will resize the
logo to fit the allotted space on the invoice.
Click the “upload” button to upload the logo image to ReceivablesPro. When your logo is successfully uploaded you will see the file name next to the button, as shown below:
Click the “save”
button at the bottom of the screen.
NOTE: This is an important, but easy
to forget step. If you do not click the “save” button the new logo
will not be saved even though it appears to have uploaded correctly
in the logo section.
NOTE: If you want to change the logo,
follow the steps for adding a logo outlined above. The new logo will
overwrite the old one.
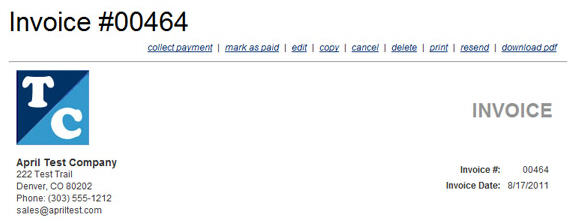
The best place to see how your logo looks is on the invoice preview screen. (To do this, create a new invoice and click the “preview” link at the bottom of the screen. See Preview the Invoice in Chapter 5 for detailed instructions.) Your logo will be included at the top of the invoice, as shown below:
If you want to remove the logo from your invoices and login pages, you can delete it by following the steps below:
On the Pick Your Preferences screen, click the “Delete” link next to the logo file name.
Click “yes” in the delete confirmation pop-up box to delete the logo, or “cancel” to keep the logo.
You are returned to the Pick Your Preferences screen and the file name for the logo will no longer appear next to the “upload” button.
Click the “save”
button at the bottom of the screen to save the change. You will no
longer see the logo on your invoices.
NOTE: This is an important, but easy
to forget step. If you do not click the “save” button the logo will
not be removed even though it appears to have been successfully deleted
in the logo section.
You can upload a new logo at any time.