![]()
![]()
When you configure global email preferences they are used as the default settings for all payments, recurring payments, and invoices sent from your ReceivablesPro system. The settings you configure on this screen will be used for all payments entered online via Customer Portal or via Web Payment pages, as well as for all payments and recurring payments imported via batches.
Global email preferences will be the default settings
for receipts, failure notifications, and schedule pre-notification emails
when you enter new payments and schedules directly from ReceivablesPro. You will be
able to make changes to individual payments and schedules on the collect new payment screen.
NOTE: While you can customize the content
on individual email templates, you can have only one version of each template.
So for example, it is not possible to use one template version for credit
card payments entered via the UI and a different template for credit card
payments entered by your customers on a web payment form.
Follow the steps below to configure your email preferences:
Click the “email preferences and templates” link on the Settings--> Configuration screen.
The Select Email Options And Edit Templates screen opens.
In the top PAYMENT FAILURE NOTIFICATIONS section set the default Failure Notification settings for the collect new payment screen. You will be able to make adjustments on a case by case basis when entering new payments.
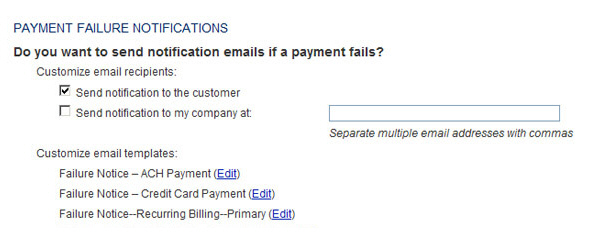
Check
the “Send notification to the customer” box if you want to send
failure notifications by default. When you check this box, any
failure notifications will automatically be sent to the main email
address attached to the Customer Record. Leave the box unchecked
if you don't want to send customer failure notifications.
NOTE: The email address will always
be displayed on the collect
new payment screen so
you’ll always know the exact address to which the failure notifications
will be emailed.
Check
the “Send notification to my company at:” box if you want to send
the failure notification to a different email address, and enter
the email address(es) you want to use in the field. You can enter
any email address you like in this field, and can enter multiple
email addresses separated by commas.
NOTE: If you have also elected to
send a failure notification to the customer, the email address(es)
entered in this field will be the email CC addresses. If the “Send
notification to the customer” box is not checked, then email addresses
in this box will be placed in the email To field.
Use the TRANSACTION RECEIPTS section to set the default receipt settings for the collect new payment screen. You will be able to make adjustments on a case by case basis when entering new payments.

Check
the “Send notification to the customer” box if you want to send
payment receipts by default. When you check this box, a receipt
will automatically be sent to the main email address attached
to the Customer Record. Leave the box unchecked if you don't want
to send customer receipts.
NOTE: The email address will always
be displayed on the collect
new payment screen so
you’ll always know the exact address to which the receipt will
be emailed.
NOTE: If you want to send receipts for online payments and for
imported payment batches you must check this box.
Check
the “Send notification to my company at:” box if you want to send
the payment receipt to a different email address, and enter the
email address(es) you want to use in the field. You can enter
any email address you like in this field, and can enter multiple
email addresses separated by commas.
NOTE: If you have also elected to
send a receipt to the customer, the email address(es) entered
in this field will be the email CC addresses. If the “Send notification
to the customer” box is not checked, then email addresses in this
box will be placed in the email To field.
Use the RECURRING PAYMENT REMINDERS section to configure email notification settings for recurring payment schedules.
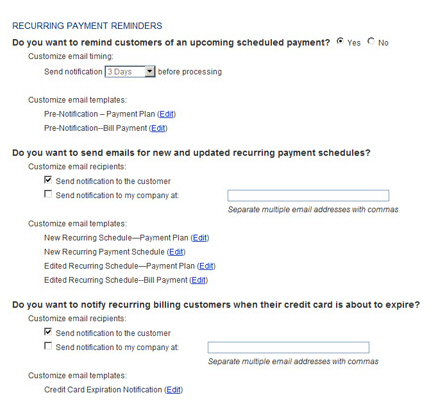
You have the option to automatically send a notification to a customer prior to a payment that is part of a recurring payment schedule. This email is always sent to the main email address attached to the Customer Record.
To
send the email, select the “Yes” radio button for the “Do
you want to remind customers of an upcoming scheduled payment?”
question. Select the “No” radio button if you don’t want to
send the reminder email.
NOTE: The setting you configure
here will be the default setting on the collect new payment screen.
You can make changes to each individual schedule when it is
created without affecting this global setting.
From the Customize email timing drop-down box, select the number of days prior to the payment date you want to send the notice. You can select between 1 and 10 days.
You have the option to send
email notifications when new schedules are created and when they
are edited. (The changed schedule email is only sent for a material
change of the Amount, Frequency, Start Date, End Date, or Payment
Account.) Customize these settings in the “Do you want to send
emails for new and updated recurring payment schedules?” section.
The settings you configure here will be used for all recurring
payment schedules. You cannot make changes to individual schedules
for these settings.
|
The default system setting is to send both the new schedule email and the schedule change email. Credit card and ACH processing rules require that these emails be sent for every new schedule entered and when any material change is made to a schedule. Failure to send these notifications is very likely to result in chargebacks, and possibly the suspension of your processing rights. You are provided with the option to turn these emails off—however if you choose to do so make certain that you are providing confirmation of new schedules and schedule changes to your customers in some other way (i.e. fax or regular mail). |
Check the “Send notification to the customer” box if you want to send new schedule and schedule change emails to the main email address attached to the Customer Record.
Check
the “Send notification to my company at” box if you want to
send the new schedule and schedule change emails to a different
email address, and enter the email address(es) you want to
use in the field. You can enter any email address you like
in this field, and can enter multiple email addresses separated
by commas.
NOTE: If you have also elected
to send to the customer, the email address(es) entered in
this field will be the email CC addresses. If the “Send notification
to the customer” box is not checked, then email addresses
in this box will be placed in the email To field.
You have the option to send an email to your customer when the credit card attached to one of their active recurring payment schedules is about to expire. This email goes out on the first of the month in which the card expires. (For example, if the credit card has an expiration date of May, 2011 this email will be sent on May 1, 2011.)
Check the “Send notification to the customer” box if you want to send credit card expiration emails to the main email address attached to the Customer Record.
Check
the “Send notification to my company at” box if you want to
send the credit card expiration emails to a different email
address, and enter the email address(es) you want to use in
the field. You can enter any email address you like in this
field, and can enter multiple email addresses separated by
commas.
NOTE: If you have also elected
to send to the customer, the email address(es) entered in
this field will be the email CC addresses. If the “Send notification
to the customer” box is not checked, then email addresses
in this box will be placed in the email To field.
Use the INVOICES section to configure the system to copy your company on all invoice emails sent by the system and to edit the invoice email sent for all invoices that are not past due.
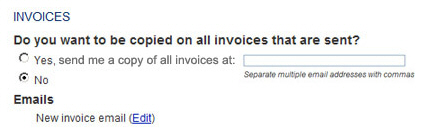
Select the “Yes, send me a copy of all invoices at:” radio button to have all invoice emails copied to your company.
Leave the text box blank if you want the invoices sent to the “Primary account contact” email address. (The email address shown on the Settings--> Your Account screen.)
Enter
a specific email address (or multiple addresses separated
by commas) in the text box to have the invoices sent to those
addresses.
NOTE: When you select the “Yes,
send me a copy of all invoices at” radio button, the “Send
me a copy” box will be automatically checked on the Send invoice by
email and Recurring Invoice
Email screens, and the
invoices will be sent to the address(es) you specify here.
You can manually uncheck the “Send me a copy” box on any individual
invoice or invoice schedule. If you do this, no copies of
the invoice will be sent, regardless of the settings entered
on this screen.
Select
the “No” radio button if you do not want to be copied on invoice
emails. (This is the default setting.)
NOTE: You can always check the “Send
me a copy” box on the Send
invoice by email and
Recurring
Invoice Email screens to
receive a copy of any individual invoice. This copy will always
be sent to the “Primary account contact” email address.
Use
the PAST DUE INVOICE FOLLOW-UP section
to configure the system to re-send invoices that have not been paid
by their designated due date. The system will automatically re-send
the past due invoice one time, based on the configuration setting
entered here.
NOTE: You can manually re-send the invoice
at any time by selecting the “Resend invoice” link from the Action button
menu in the Invoices
table. (See Resending Invoices in Chapter 5 for how to do this.)

To send the email, select the “Yes” radio button for the “Do you want to automatically re-send an Invoice if unpaid?” question. Select the “No” radio button if you don’t want to send the reminder email.
From the Customize email timing drop-down box, select the number of days after the due date that you want to send the invoice again. You can select 3 days, 5 days or 1 week.
Click the “save” button at the bottom of the page to save your settings, or click the “cancel” button to discard them and return to the configuration dashboard.
