![]()
![]()
To edit a custom field:
Locate it in the Custom Fields table.
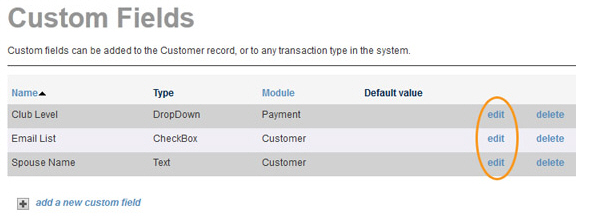
Click the “edit” link in the row of the field that you want to edit.
The Custom Field Details screen opens in edit mode, with the current values for the field displayed in editable fields.
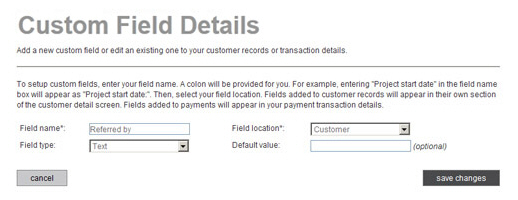
From this screen you can:
Edit
the Field name.
NOTE: The new (changed) field name
will be displayed on the customer and payment screens, and in
any transaction details pages you view or email—even for transactions
processed prior to the change.
Change the
Field location. You can switch a field from the Customer
module to the Payment module, or from the Payment module to the
Customer module.
NOTE: If you do this, any values
stored in the field will not be transferred to the new module;
they will be treated as if you deleted the field. For example,
if you had a Customer field for “Apartment #” and changed that
field to a Payment field, the value saved with the Customer Record
would be deleted, and you would need to enter it again on each
new payment processed for the customer.
Change
the Field type. If
you change the Field type
to a DropDown from any other
Field type, you will need to define the drop-down list
items. (See above for instructions on how to
do this.)
NOTE: Be very careful when changing
the Field
type, since it is possible
to lose saved data when you do this. For example, if you change
the Field
type from Text to CheckBox
you will lose all previously saved data in the field.
Change
or remove the Default value.
NOTE: If you change or remove the
Default
value, all previously saved
customers and previously processed payments will not
inherit the new value.
When you’re finished making changes, click the “save changes” button to save your work. Or click the “cancel” button to discard it, and keep the field as is.
You return to the main Custom Fields screen, and the table will reflect any changes made.