![]()
![]()
Follow the steps below to add a new custom field to the Customer or Payment module.
From the configuration tab in the Settings section, click the “custom fields” link in the ADDITIONAL OPTIONS section of the screen.
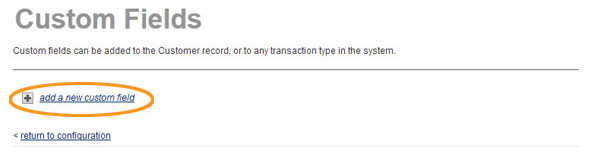
The Custom Fields screen opens.
If you have already defined custom fields, they will be displayed in a table. If you have yet to define any fields, you will not see a table.
Click the “add a new custom field” link.
The Custom Field Details screen opens.
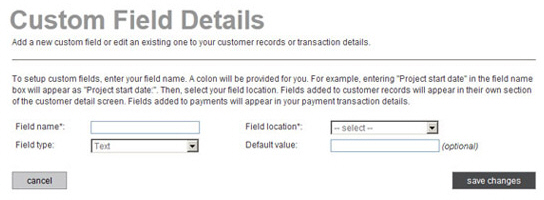
Enter a Field name. Do not enter a colon (:) after the name, the system will automatically add it for you. (i.e., enter “Sample Field” not “Sample Field:”)
NOTE: This Field name will display on the ReceivablesPro screens you use to enter or edit customers and payments, as well as on the Transaction Details screen and transaction details emails you send to customers.
From the Field location drop-down box, select “Customer” to add a custom field to the customer module, or select “Payment” to add a custom field to the payment module.
Text-- Creates a blank text field that you can use to enter up to 255 characters of text.
You have the option to enter text in the Default value field.
NOTE: If you enter text here for a Customer field, it will be pre-populated in the field for every NEW customer in your system entered after the custom field is saved. If you enter text here for a Payment field, it will be pre-populated for all NEW one-time payments entered after the custom field is saved.
Text area-- Creates a blank text area that you can use to enter large amounts of text on multiple lines.
You have the option to enter text in the Default value field.
NOTE: If you enter text here for a Customer field, it will be pre-populated in the field for every NEW customer in your system entered after the custom field is saved. If you enter text here for a Payment field, it will be pre-populated for all NEW one-time payments entered after the custom field is saved.
CheckBox-- Creates a checkbox that can be checked or unchecked. The default state for a checkbox is always unchecked.
DropDown-- Creates a list of items from which you can select. You can only select one item in a DropDown field; ReceivablesPro does not support multiple selections. When you select this option, the Drop Down List Items area appears, as shown below, for use in configuring the items in the drop-down box.
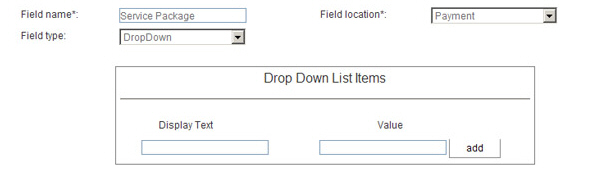
For each item you want to add:
Enter Display Text in the first field. This is the text that you want shown in the drop-down box your customers and users see.
Enter Value in the second field. This is the value that you want to appear in reports, on receipts, and on the transaction details page. For example, if you use an internal inventory system to code shirt size, you might want to use Display Text of “Extra Large” and a Value of “XL--999G” so that you can export a report of orders into the inventory system.
NOTE: In most cases it is a good idea to make the Display Text and the Value the same so your customers recognize the value on the receipt they receive as the one they selected.
Click the “add” button to create the new entry.
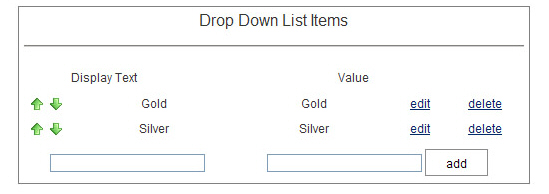
You will now see the item you just created in a list above the add list item line.
Repeat steps i - iii to add additional items to the drop-down list.
The items will be displayed in the order in which they are added. You can move items by using the green up and down arrows to the left of each entry. For example, in the above screen capture, to move Silver above Gold, click the up arrow to the left of Silver, or click the down arrow to the left of Gold.
You can edit any Line Item by clicking the “edit” link in its row. You will then see the current values for the Display Text and Value fields in editable format. Make any required changes, then click the “save” link to save the change. Or click the “cancel” link to discard the change and close edit view.

To delete a Drop Down List Item, click the “delete” link located in its row.
NOTE: You will not be prompted to confirm the delete. Once you click the link, the item will be deleted. However, if you made a mistake, you can always re-add the item.
Click the “save changes” button at the bottom of the screen to save the new custom field. Or click the “cancel” button to discard it.
You return to the main Custom Fields table, with the new field at the bottom of the list.