![]()
![]()
Once you have created your Payment import file, follow these steps to import it into ReceivablesPro.
Go to the ReceivablesPro Import Center. Do one of the following:
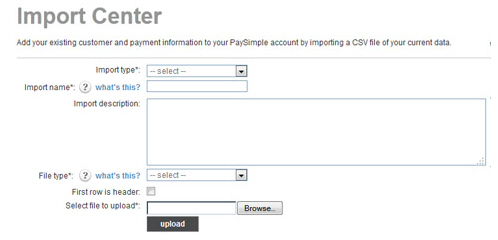
Click the “import” link at the top of the Payments table, as shown:
Click the “Settings” link in top navigation, then click on the “import center” tab.

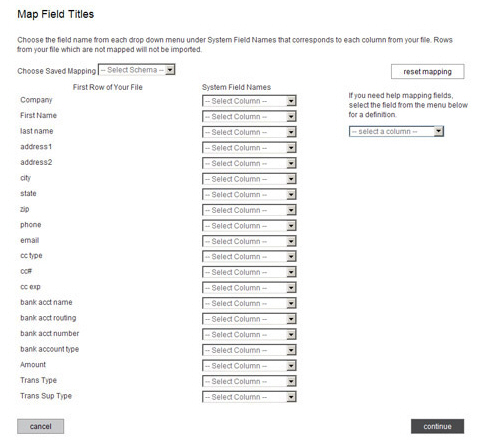
The Import Center dashboard screen opens, as shown below. (For more information on the Import Center dashboard see Import Center Dashboard in Chapter 8.)
Enter a short descriptive name for your import in the Import name field. This name will be used when referencing this particular import batch in tables on the Import Center dashboard.
Enter a short description of the upload in the Import description field. (Optional)
In the File type drop-down box select the type of file you will be importing. You can use a .csv file (recommended) or a pipe-delimited text file.
If the file you are importing contains a header row, check the First row is header checkbox. (Using a header row is very helpful for the field mapping that you will perform in Step 11.) If there is no header row, leave this box unchecked.
Click the “Browse”
button to locate the import batch file on your computer.
NOTE: In the Google Chrome browser, the
button will say “Choose File” and will be to the left of the field.
Click the “upload” button to begin the import process.
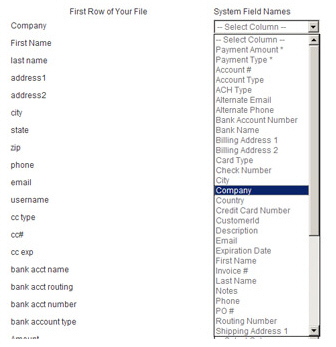
The system will perform a preliminary validation of your file. If it is corrupt or unusable, you will see an error message. Otherwise, you will see the Map Field Titles screen, shown below:
The first column displays the values in the first row of each column in your file. These will either be the values in your header row, or the first row of data (if your file does not contain a header row).
The second column contains drop-down boxes used to map fields in your file to ReceivablesPro system fields.
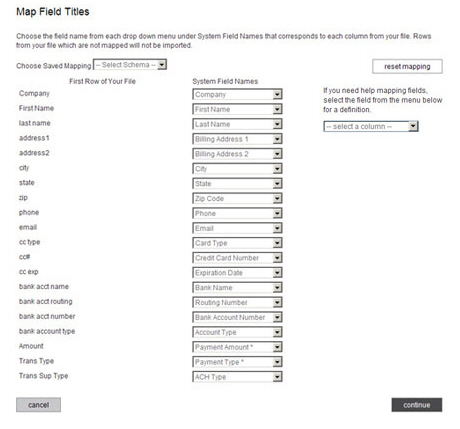
The Choose Saved Mapping drop-down box enables you to select a saved mapping schema. (See About Saved Mapping Schemes in Chapter 8 for instructions on using saved mappings.)
The “reset mapping” button will clear all values in the System Field Names drop-down boxes so that you can begin the mapping process again.
The help box, located under the “reset mapping” button provides definitions for all of the ReceivablesPro system fields. Select a field name from the drop-down, and its definition will appear under the box.
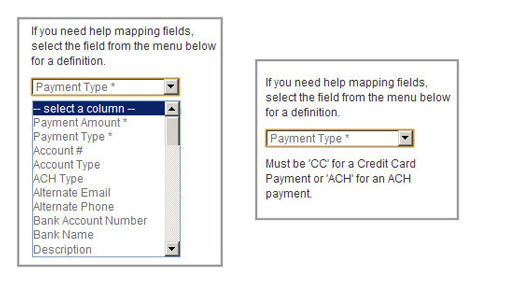
For each column
you want to map from your file, select a corresponding ReceivablesPro field from
the associated drop-down box, as shown below. If you do not want to
map a field from your file, leave the corresponding drop-down box
set to “-Select Column-.”
NOTE: Fields that you select will disappear
from the list of available fields. This prevents you from accidentally
creating duplicate mappings.
Once you have finished mapping fields it should look something like the sample below. Click the “continue” button.
On
the next screen (shown below), enter a name for the mapping you just
created in the Mapping Name field.
You can select this mapping at a later date from the Choose
Saved Mapping drop-down box to quickly map a file using
the same column structure.
NOTE: You are required to save your mapping.
Even if you never expect to use it again, storing it will save time
if there is an error processing your import file and you need to upload
your file again.

Enter a Description for the mapping if you like. (Optional)
Click the “save & continue” button.
The Approve File Import For Processing screen appears, as shown below.
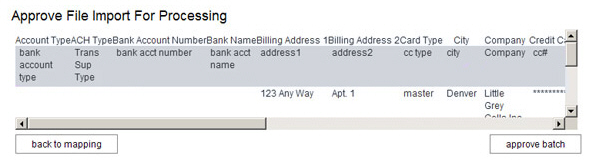
The top line (in white) contains the ReceivablesPro system field names, in alphabetical order.
The second line (in gray) appears only if your file has a header row, and contains the field names in that header row.
The
following 5 lines (in white) contain the first 5 data rows from
your file. You can scroll through them in the table.
NOTE: Credit card numbers are encrypted
immediately upon being uploaded into ReceivablesPro,
so you will only see the last four digits of a credit card number
in the table.
Double check that your mapping correctly matched fields in your file to ReceivablesPro system fields.
If you see an error, click the “back to mapping” button to return to the mapping screen (Step 10.), correct any errors, and proceed.
When you’re satisfied with the mapping, click the “approve batch” button.
When the file is successfully uploaded and queued for processing, you’ll see an on-screen success message as shown below. (If there are errors you’ll see an on-screen message indicating the corrections that need to be made.)

Click the “Import Center” link to return to the Import Center dashboard and view the status of your file.
Continue with Viewing Results from a Payment Import.