![]()
![]()
You cannot delete a recurring payment schedule from ReceivablesPro once it has started. However, you can suspend it so that it no longer generates new transactions. To suspend a recurring payment schedule:
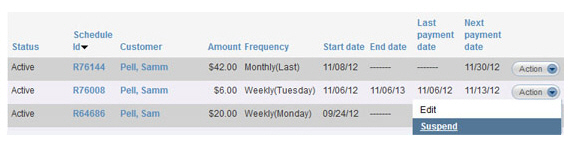
Locate the schedule you want to Suspend in the Recurring Payments table.
Click the Action
button then click the “Suspend” link, as shown below.
NOTE: You will only see this option if
the schedule is “Active.”
NOTE: You can also access the Suspend function while viewing schedule
details (see Viewing Recurring Payment Schedules) by clicking the “suspend schedule” link
at the top-right of the screen.
A pop-up window will open in which you configure the suspension settings.
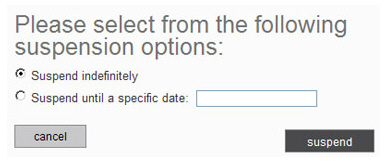
To suspend the schedule indefinitely, leave the “Suspend indefinitely” radio button selected. If you select this option, the schedule will remain “suspended” and will not generate any payments until you manually turn it back on.
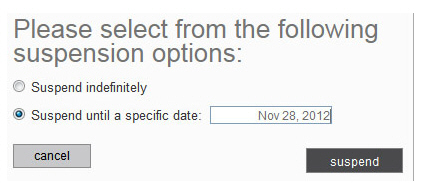
To
suspend the schedule until a specific date, select the “Suspend
until a specific date” radio button, then place your mouse in
the field to open the calendar. Click on the date you want the
schedule to automatically resume, or simply type the date in the
field. If you select this option the schedule status will automatically
change back to “Active” on the date you indicate.
NOTE: If you want to resume the schedule
prior to the date you selected, you can do that manually. You
cannot directly change the resume date on a “Suspended” schedule.
You must first “Resume” the schedule, then “Suspend” it again
and enter the new resume date.
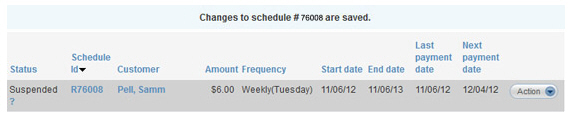
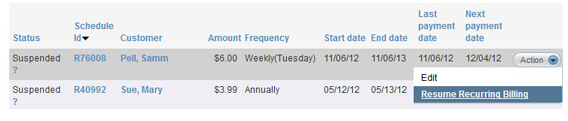
The
Status of the schedule
is changed to “Suspended” and the Next
payment date field will
be blank if you suspended the schedule indefinitely, or will contain
a Next payment date based
on the resume date. For example, in the schedule shown below the schedule
Frequency is weekly on
Tuesdays, and as we suspended it until November 28, 2012 in the previous
step, the Next payment date
is December 4, 2012.
NOTE: Click the question mark next to
the “Suspended” status to see the resume date for the schedule.
Once a recurring payment schedule has been “Suspended,” either indefinitely or until a specific date, you can turn it back on manually at any time. To do this:
Locate the schedule you want to Resume in the Recurring Payments table.
Click the Action button then click the
“Resume Recurring Billing” link, as shown below.
NOTE: You will only see this option if
the schedule is “Suspended.”
NOTE: You can also access the Resume function while viewing schedule
details for a suspended schedule (see Viewing Recurring Payment Schedules) by clicking the “resume schedule” link at
the top-right of the screen.
You will now see the Status of the schedule changed to “Active” and the date the next payment on the schedule will be processed will now be in the Next payment date column.

|
Each
time you suspend or resume a recurring payment schedule your customer
will receive an email confirming the change. The email will include
the current status of the schedule, and will also include the
next payment date for the schedule. |
|
If you suspend a recurring billing schedule and do not reactivate it prior to a programmed End date, you will no longer see the “Resume recurring billing” link under the Action button. 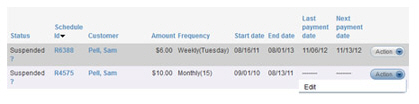
|
Next Section: Importing Recurring Payment Schedules >
