![]()
![]()
The basic steps for processing a swipe credit card transaction using the ReceivablesPro Android Mobile App are as follows:
The Android App opens to the first screen for collecting a payment. Enter the Payment Amount in the first field on the Collect Payment screen.
Tap the “Checkout” button.
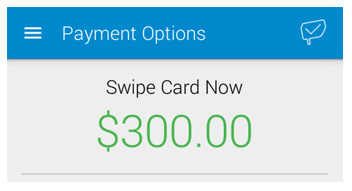
The Payment Options screen opens with the amount entered displayed.
Attach the ReceivablesPro card swipe device (if it is not already attached).
NOTE: If the swiper is attached you will see a “Swipe Card Now” header message, if it is not the message will tell you to “Please insert card reader.”
Swipe the card.
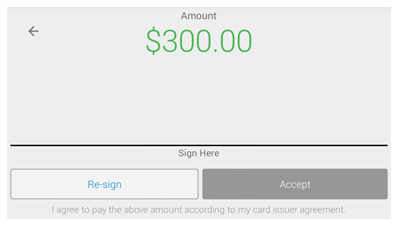
If the transaction amount is over $25 you will see the signature screen. Hand the device to your customer for a signature, and have them tap the Accept button to approve the charge. If the transaction is under $25, a signature is not required and you will not see this screen.
NOTE: For swipe transactions processed as MOTO (card not present), a signature is not required. Providing your customer the ability to sign for and confirm the transaction is currently cosmetic and included to help them feel more comfortable about the mobile payment. If you do not want to use this feature, it is fine to omit the signature and simply tap the Accept button on the screen yourself to complete the transaction.
The Confirm Payment screen is shown. It includes the Payment Amount, cardholder name, card type, first six and last four digits of the card number, and the expiration date. Confirm that all this information is correct.
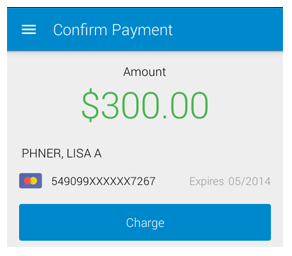
Tap Charge.
The Payment Confirmation screen opens and indicates whether your transaction was authorized or whether it failed.
Enter an email address and tap Send Receipt to email a receipt for the transaction, or tap Skip to skip the receipt and return to the Collect Payment screen.
NOTE: For detailed instructions on collecting one-time payments see Using ReceivablesPro Mobile for Android below.
Next Section: Using ReceivablesPro Mobile for iOS >