![]()
![]()
The default view on the Customer Portal dashboard is the invoices tab, which provides a table of the last 90 days of invoices for your customer.

To change the default date-range:
Click the down arrow on the Dated within field to open the date range box, as shown below.
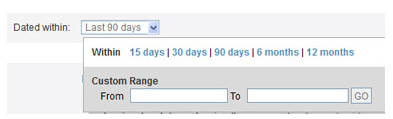
Click one of the linked pre-programmed date ranges, or enter a set of custom dates. To do this:
Click the From field then select the start-date from the calendar that appears.
Click the To field, and select the end date from the calendar that appears.
Click the “GO” button.
The Invoices
table refreshes and contains only invoices sent within the
date range selected.
NOTE: The invoice date is not displayed
in the table. However, when you view the invoice you will see it.
The INVOICE
SNAPSHOT summary row, located at the very top of the table,
provides a summary of Outstanding invoices and
Past due invoices. The number
in parenthesis indicates the number of invoices in each category, and
it is followed by the total dollar value of the invoices.
NOTE: Past due invoices are included in both
the Outstanding
invoice total AND the Past due invoice total.
The table contains the following key elements:
Status: This column indicates whether
the invoice is Paid, Unpaid, Paid
(partial), Overdue, or Cancelled.
NOTE: Invoices that have been partially
paid will change Status from “Paid (partial)” to “Overdue” after the
invoice due date has passed.
Invoice due date: The date on which the invoice is due, or must be paid to avoid late fees.
For invoices with a status of “Paid” this will equal the Invoice amount field.
For invoices with a status of “Unpaid” this will be $0.
For invoices with a status of “Paid (partial)” this field will indicate the amount paid to date.
Payment type: Indicates the method of payment used to discharge the invoice.
Credit Card Types: Visa, MasterCard, Amex (for American Express), Discover.
Echeck (ACH)
Types:
--TEL: Authorized over the phone.
--PPD: Authorized in writing.
--CCD: Any business to business transaction.
--WEB: Authorized via an online payment form.
NOTE: Any ACH payment made via Customer
Portal will be coded WEB.
A line in this field means either that the
invoice is unpaid, or that you (the merchant) manually marked the
invoice as “Paid” on the manage invoices screen
in your ReceivablesPro account.
NOTE: If the invoice Status is “Paid”
and a line appears in this field, that indicates to the customer that
the invoice was marked as “Paid” and that they will not find a corresponding
“Payment” transaction for the invoice payment in Customer Portal.
Outstanding Balance: The amount
yet to be paid on the invoice.
NOTE: This amount is dynamically updated
take Early
Payment Incentives and Late Payment Fees into account. The exact incentive discounts
and penalty fees can be determined by viewing the invoice. (See About Invoice Incentives and Penalties in Chapter
5 for more information
about invoice incentives and penalties.)
For invoices with a status of “Paid” this will be $0.
For invoices with a status of “Unpaid” this will equal the Invoice amount minus any applicable Early Payment Discount.
For invoices with a status of “Paid (partial)” this field will indicate the invoice balance—the amount that still needs to be paid.
For invoices with a status of “Overdue” this will equal the Invoice amount field plus any applicable Late Payment Fee.
Schedule ID: The schedule ID for any invoice that was generated as part of a recurring invoice schedule. If this field is blank, then the invoice is not from a schedule.

If the invoice has not yet been paid in full, the Action button menu will include a “Pay” link. Click the “Pay” link to pay the invoice. (See Paying Invoices in Customer Portal for how to do this.)
Click the “View” link to view the invoice.
If the invoice has not been paid, it will contain a section that
enables the customer to pay it. If it has been paid, it will be
marked as “INVOICE PAID” and no payment fields will be included,
as shown below.
NOTE: You can click the “download/save”
link at the top of the invoice view screen to save any invoice
as a .pdf file.

Click the “Print” link in the menu to view the full invoice and send a copy of it to your default printer.
The last line of the table will indicate how many invoices are in the report for the selected date range. Navigate through results by clicking the linked page numbers.
Sort any of the linked column headers (all except Payment type, Confirm. #, and Schedule ID) by clicking on them. The first click sorts from low-to-high (or A-to-Z), and the second click sorts from high-to-low (or Z-to-A).
Next Section: Paying Invoices in Customer Portal >
