![]()
![]()
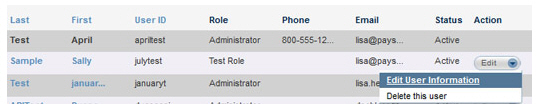
User Records can be opened in edit mode by clicking the “Edit User Information” link in the Edit menu in the Action column on the Users table, or by clicking the linked First name or Last name of the user in the Users table.
There is no view only mode for User Records. To view full user details, open the User Record in edit mode. The Edit User screen is shown below:
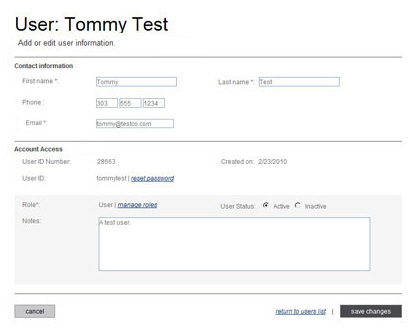
The screen contains the following elements, some of which can be changed and others which are display only:
First name-- Enter new text to change this field.
Last name-- Enter new text to change this field.
Phone-- Enter new text to change this field.
Email--
Enter a new email address to change this field.
NOTE: This will change the email address
to which password reset emails are sent.
User ID Number-- This is the unique identifier ReceivablesPro assigns to the user. It cannot be changed.
Created on-- This is the date on which the user account was created. It cannot be changed.
User ID-- This is the User ID assigned
to the user when it was activated. It cannot be changed. Click
the “reset password” link to reset the password and send the User
a password reset email that contains a link they can use to reactivate
the User account and create a new password.
NOTE: If the user is ever locked out
of ReceivablesPro due
to excessive failed logins, the only way to unlock the account is
to click the “reset password” link on this screen.
Role-- This field indicates
the role currently assigned to the user. Click the “manage roles”
link to open the Please select role
pop-up window and select a different role for the user. (See
Roles below for more information.)
NOTE: You cannot change the role assigned
to your own user.
User Status-- Indicates whether
the User is “Active” or “Inactive.” Select the radio button for the
status you want to set for the user. Inactive users cannot login to
ReceivablesPro.
NOTE: You cannot set your own user to
“Inactive.”
Notes-- Enter or remove any text in this field.
Click the “save changes” button at the bottom of the screen to save your changes and return to the Users dashboard. Click the “cancel” button to discard the changes.
