![]()
![]()
You can view any one-time invoice or any invoice generated by a recurring invoice schedule regardless of status. Viewing an invoice displays it exactly as it will appear to your customer when they view it online. At the bottom of the invoice view screen you will see a table listing each time the invoice was emailed to your customer and an Invoices table listing all system actions associated with the invoice.
The top of the invoice view screen provides access to all of the Actions available for that invoice. It provides the same options you will find under the Action button menu.
You will also be able to enter comments related to the invoice from this screen. When you’re done viewing the invoice, click the back button to return to the previous page, or select another navigational option.
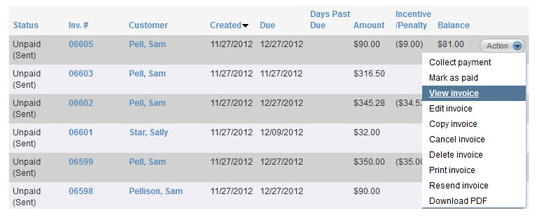
Locate the invoice you want to view in the Invoices table.
Click the Action
button, and then click the “View invoice” link.
NOTE: You can also click the linked Inv. #
to open any invoice in view mode.
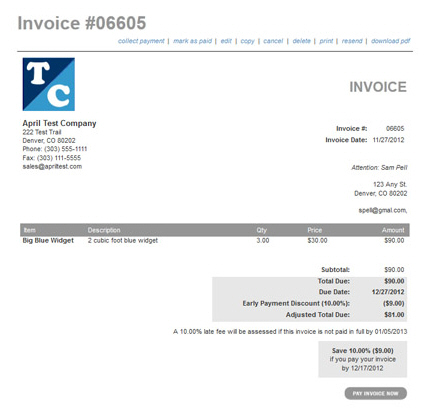
The invoice opens, as shown below.
The top portion of the screen provides a preview of the invoice, exactly as your customer will see it.
|
When you view invoices they will reflect the current status of the invoice, as well as any active incentives or penalties and any payments made on it. For example, in the screen capture below the invoice has a Status of “Past Due,” a $31.65 penalty fee, a $200.00 payment, and a $ 148.15 balance. 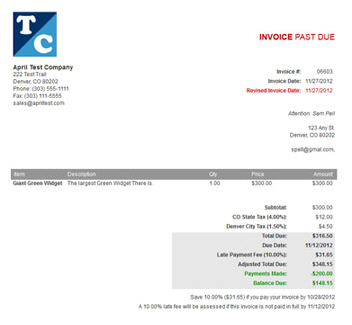
|
The links at the top of the invoice vary depending on invoice status. They launch the same functions as the links of the same name under the Action button menu in the Invoices table on the manage invoices screen.
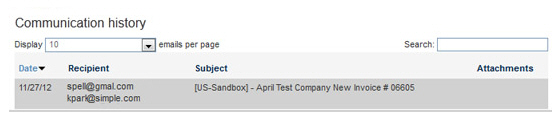
The Communication
history table at the bottom of the screen contains
a row for each time the invoice was sent, and provides send date,
the email to which it was sent, the subject line of the email,
and the file names for any attachments sent with the invoice email.
NOTE: If you check the “Attach invoice
as PDF” box, the Attachments column will include a file named
“Invoice.pdf.” The file name will be the same for every invoice,
regardless of invoice number.
The emails are displayed 10 at a time from oldest to newest. If there are more than 10 emails, you can use the page number links at the bottom of the table to page through them.
You can change the Display drop-down to show 10, 25, 50, or 100 emails at once.
Use the Search field to search for a particular email.
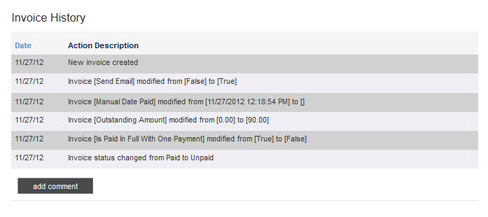
The Invoice History table includes a row for each change made to the invoice (for example a partial payment was received, or the invoice amount was changed).
|
When an invoice has been paid via ReceivablesPro (whether you enter the payment for the customer or whether the customer pays online), the Transaction ID for the payment will be included in Invoice History. Click the linked Transaction ID to open its Transaction Details screen. 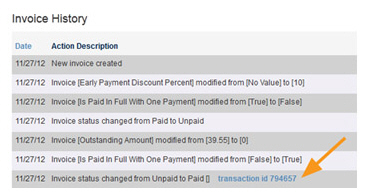
|
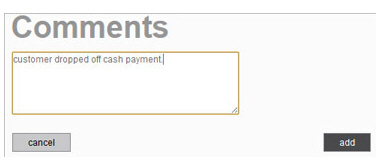
Click the “add comment” button to attach a comment to the invoice.
When the Comments pop-up opens, type your comment in the box and click the “add” button.
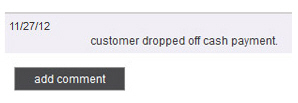
The comment is saved to the bottom of the Invoice History list.
Click the back button to return to the manage invoices screen, or select any other navigation option.
