![]()
![]()
If you receive a payment for an invoice outside of ReceivablesPro, you can record it in the system. For example, your customers may mail you a check or money order or pay cash.
Watch the following one minute video tutorial to see how it’s done. Detailed step-by-step instructions on how to mark an invoice as “paid” in ReceivablesPro follow:
|
If you attempt to use the Mark as Paid function on an invoice with a negative Balance Due the system will error. If your invoice has a negative Balance Due use the Zero Balance function first, then use the Mark as Paid function to set the invoice Status to "Paid." (See Setting Invoice Balance to $0.) |
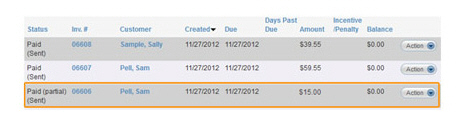
Locate the invoice you want to mark as paid in the Invoices table. (The invoice must have a Status of “Paid (partial),” “Unpaid,” or “Past Due.”), as shown below:
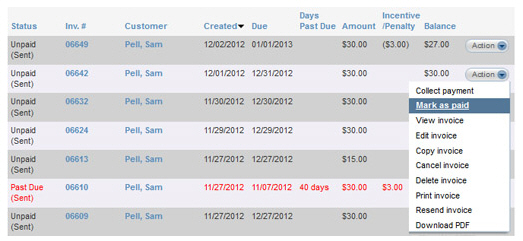
Click the Action button, then click the “Mark as paid” link.
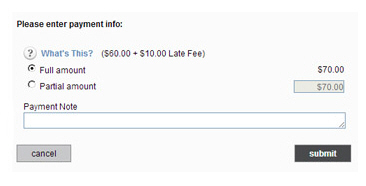
A pop-up box will appear asking you to enter the amount of the payment, as shown below:
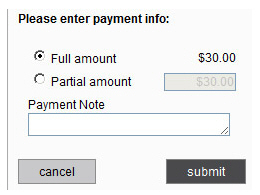
Leave
the first radio button selected to mark the invoice as paid in
full. If you do this, the invoice will have a Status of “Paid”
after you click the “submit” button.
NOTE: The Full
Amount field will always
contain the current Balance due for the invoice, which takes
any applicable incentives and/or penalties into account as well
as any partial payments already made.
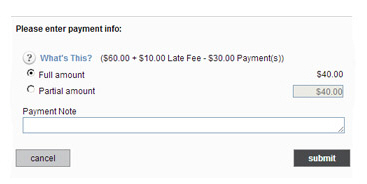
Select
the second radio button, and enter the amount of a partial payment.
You can enter any amount less than the “Full amount” of the invoice.
(If you enter more than the Full amount, you will see an error
message and will need to restart the “Mark as paid” process at
Step 1.)
NOTE: You will still see the partial
payment option if you have not enabled your system to accept partial
payments of invoices. If you enter a partial payment, after clicking
“submit” you will see an error message informing you that partial
payments are not permitted for your account.
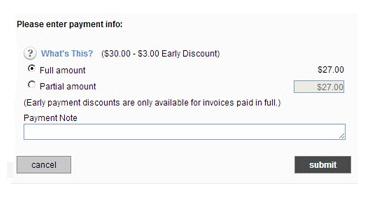
NOTE: If you enter a partial payment for an invoice to which an
Early Payment Discount is applied, the discount will be removed.
Enter
a Payment Note (optional).
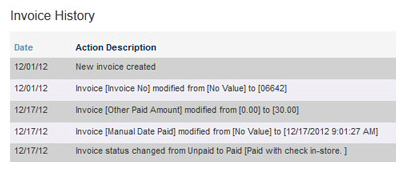
NOTE: This note will be recorded in the Invoices table
on the View
Invoice screen, as shown
below. It will also be included in the Invoice Export file. (See Exporting
Invoice History for details.)
Click the “submit” button to record the payment. (Or click cancel if you do not want to record a payment.)
If you marked only a partial payment, you will see the pop-up confirmation window shown below:

Select the appropriate button:
keep it partially paid: Clicking this button records the partial payment and updates the transaction Status to “Paid (partial).” An updated invoice is not emailed to your customer.
resend this invoice: Clicking this button records the partial payment and updates the transaction Status to “Paid (partial).” It also opens the Send invoice by email screen where you can review email settings and resend the invoice to your customer with the partial payment confirmed.
mark this invoice as paid: Clicking this button records the partial payment and marks the invoice as paid in full (even though the full Balance Due was not paid.) The status of the invoice will update to “Paid.” An updated invoice is not emailed to your customer.
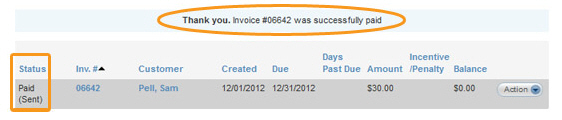
You will be
returned to the Invoices table,
a success message will appear above the table, and the invoice will
be at the top of the table with a new Status of “Paid” or “Paid (partial).”
NOTE: If you mark an invoice as paid
by mistake, or if the payment you receive is later returned (like
a bounced check) you can mark the invoice as unpaid. See Marking
Invoices as Unpaid in
the following section.
|
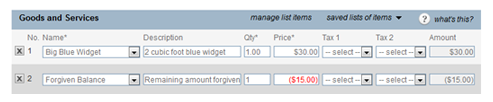
Forgiving the remaining balance on a partially paid invoice If a customer makes a partial payment on an invoice, you can forgive the remaining balance by editing the invoice and adding a line item with a negative amount equal to the balance you are forgiving. This method allows you to keep the invoice Status set to “Paid (partial),” while recording the actual amount received and setting the balance due to $0.00. Follow these steps:
|