![]()
![]()
Terms of Sale are required on all online invoice payment forms. To get you up and running quickly, your account is configured with generic Terms of Sale text that meets ACH and Credit Card processing requirements. (See Appendix A: Authorizing Transactions for detailed information on required language.)
|
It
is strongly recommended that you review these Terms
of Sale prior to sending invoices, and that you customize
them for your business. |
NOTE: These Terms of Sale apply only to your invoices—they do not apply to Web Payment Pages. When creating Web Payment Pages you enter a separate set of Terms of Sale for each payment form. (See Web Payment Pages in Chapter 8 for detailed information.)
Follow the steps below to review and edit invoice Terms of Sale:
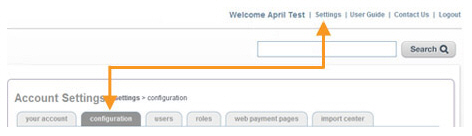
Click the “Settings” link in top navigation, then click the configuration tab:
On the configuration screen, click the “invoice settings” link in the INVOICE CONFIGURATION section.

The Select Invoice Settings Options screen opens.

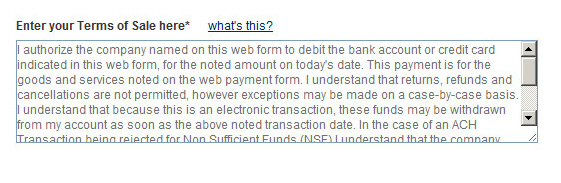
Scroll to the bottom of the screen to the Enter your Terms of Sale here section.
Review
the generic terms of sale, and make any appropriate changes. For example,
you may want to change “I authorize the company named on this form”
to “I authorize {Sample Company}” where “Sample Company” is the name
of your business.
You can enter as much text as you like in this field, so you can make
Terms of Sale as comprehensive
as necessary.
NOTE: As these Terms of Sale will appear
on the online invoice form used to collect a payment from your customers,
it is important that they meet all requirements for online Credit
Card and ACH payments. See Appendix
A: Authorizing Transactions
for more information on required language.
Click the “save” button at the bottom of the screen to save your changes.
Next Section: Quick Start Guides >
